Thank you for your interest in Red Hat Ansible Automation Platform. Ansible Automation Platform is a commercial offering that helps teams manage complex multi-tier deployments by adding control, knowledge, and delegation to Ansible-powered environments.
This guide describes how to install Ansible plug-ins for Red Hat Developer Hub. This document has been updated to include information for the latest release of Ansible Automation Platform.
Providing feedback on Red Hat documentation
If you have a suggestion to improve this documentation, or find an error, you can contact technical support at https://access.redhat.com to open a request.
1. Ansible plug-ins for Red Hat Developer Hub
1.1. Red Hat Developer Hub
Red Hat Developer Hub (RHDH) serves as an open developer platform designed for building developer portals.
1.2. Ansible plug-ins for Red Hat Developer Hub
Ansible plug-ins for Red Hat Developer Hub deliver an Ansible-first Red Hat Developer Hub user experience that simplifies the automation experience for Ansible users of all skill levels. The Ansible plug-ins provide curated content and features to accelerate Ansible learner onboarding and streamline Ansible use case adoption across your organization.
The Ansible plug-ins provide:
-
A customized home page and navigation tailored to Ansible users.
-
Curated Ansible learning paths to help users new to Ansible.
-
Software templates for creating Ansible playbook and collection projects that follow best practices.
-
Links to supported development environments and tools with opinionated configurations.
1.3. Architecture
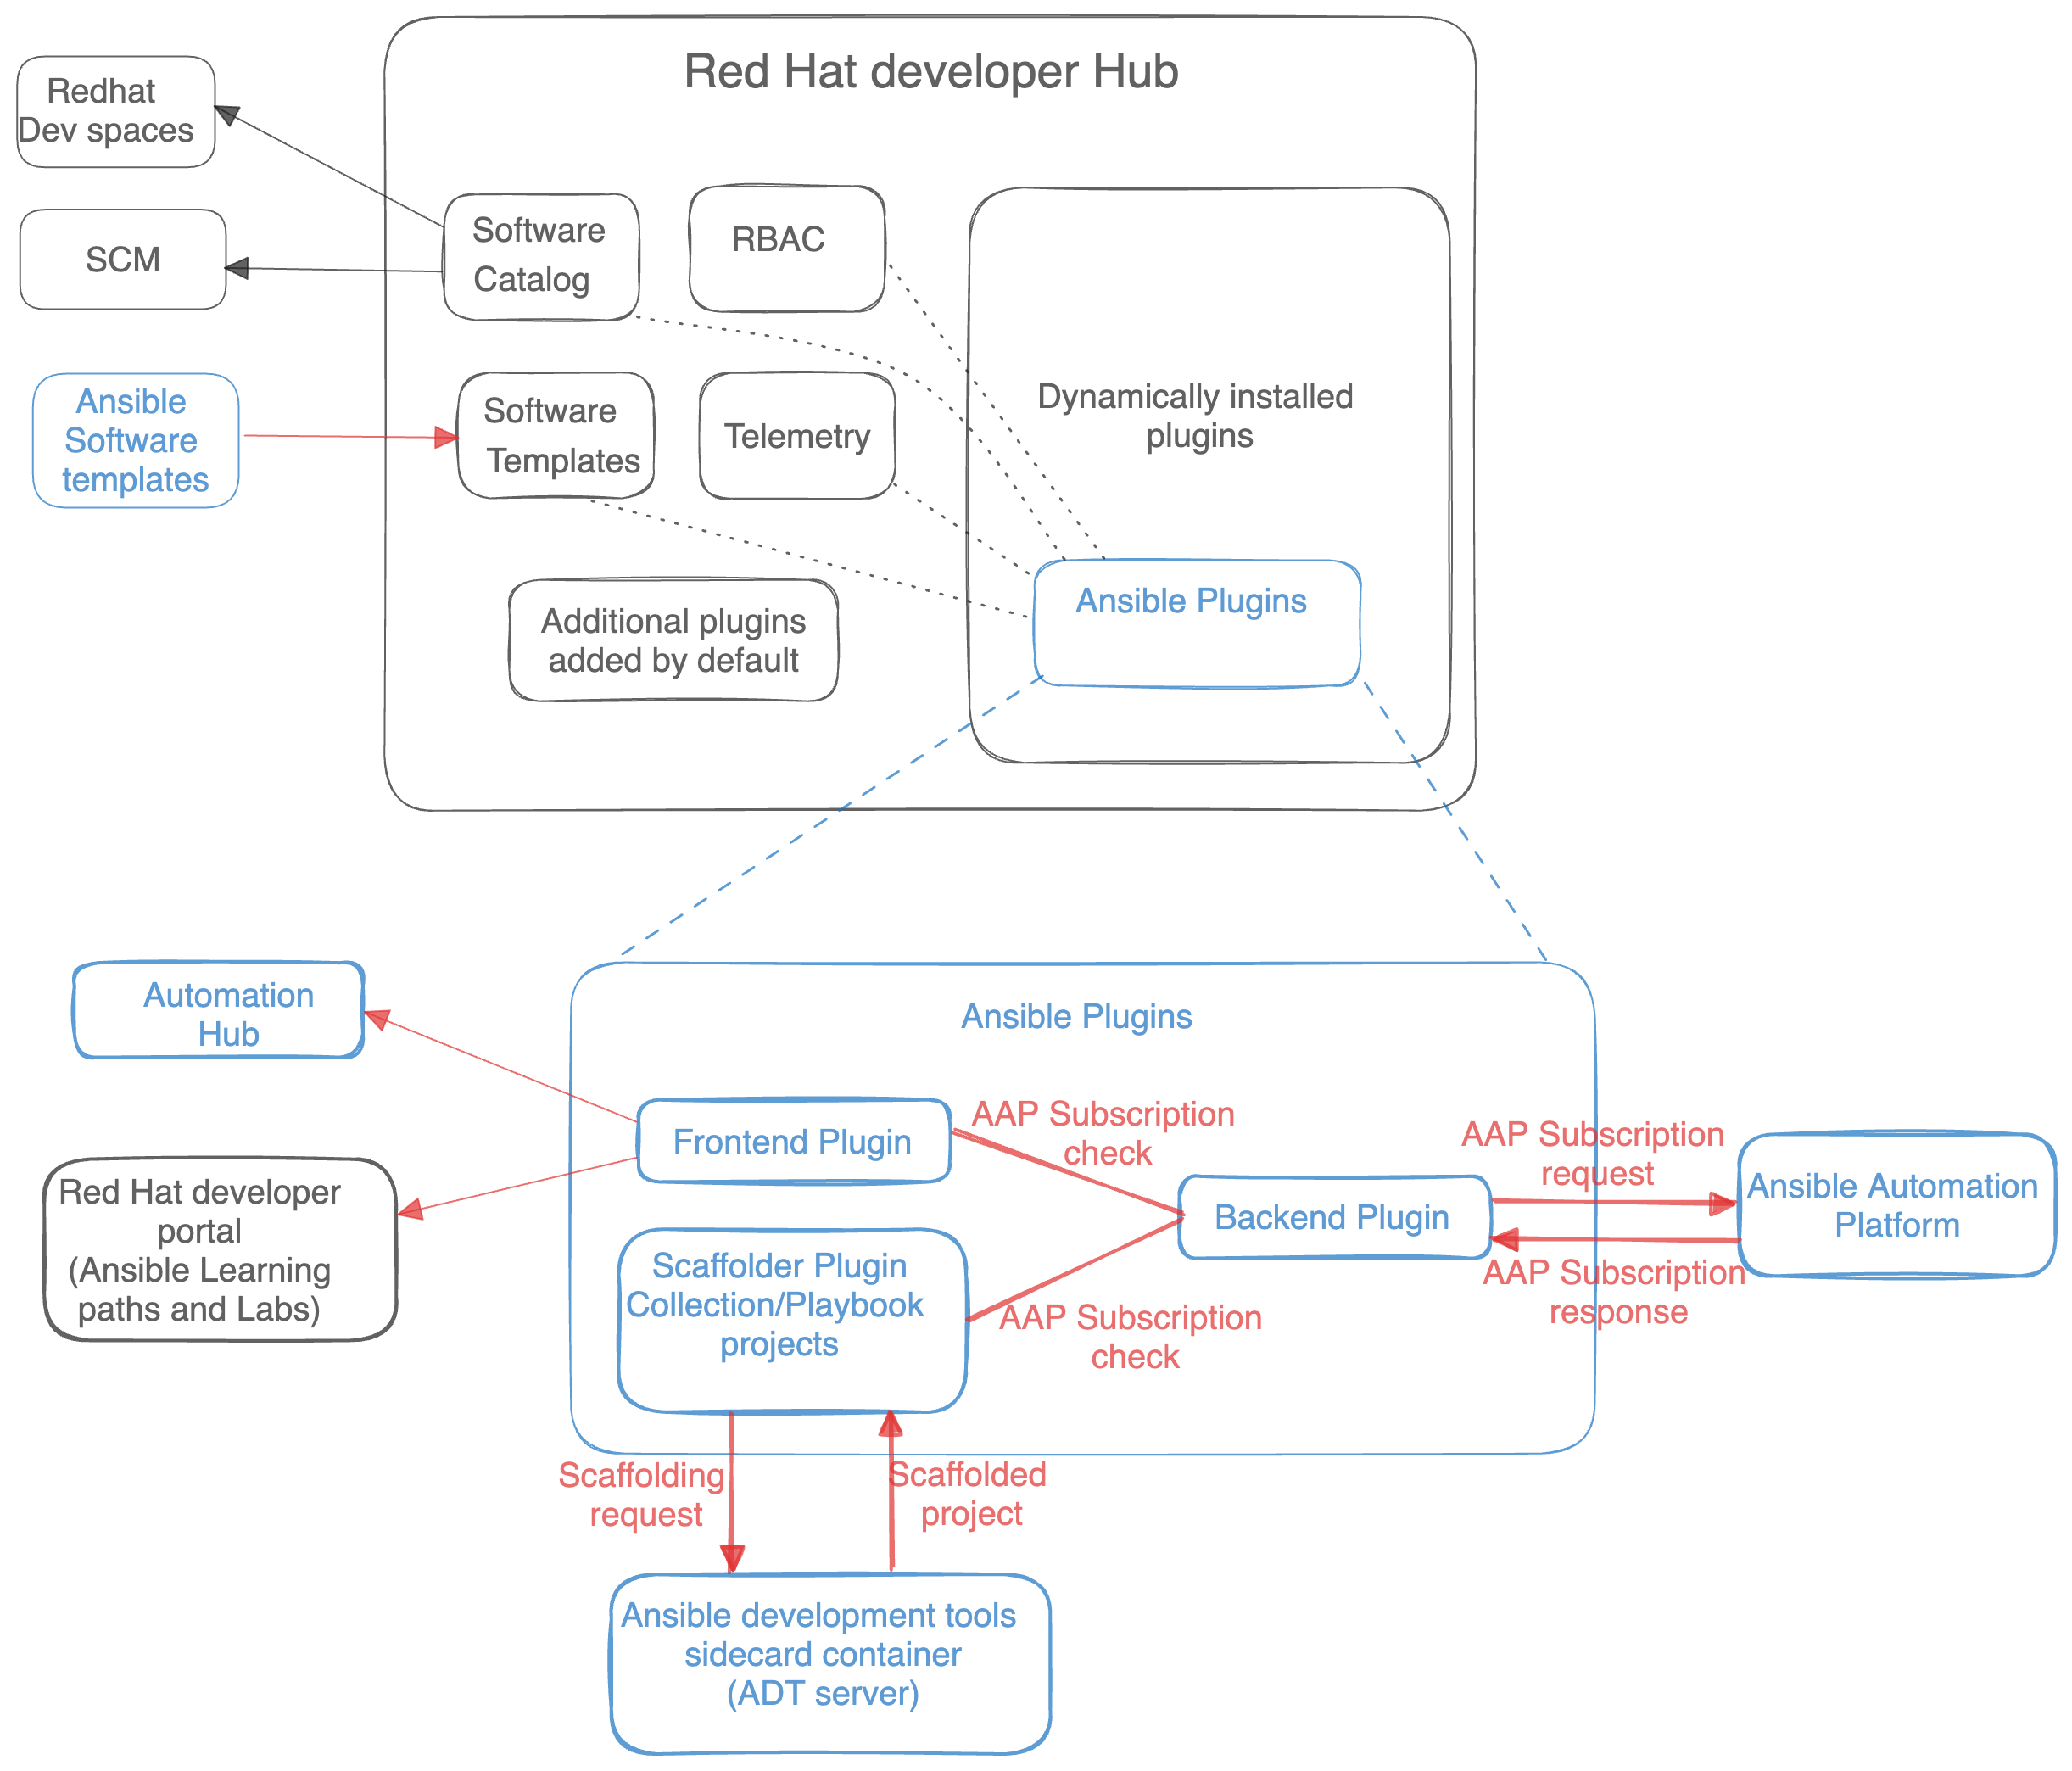
2. Installing the Ansible plug-ins with a Helm chart on OpenShift Container Platform
The following procedures describe how to install Ansible plug-ins in Red Hat Developer Hub instances on Red Hat OpenShift Container Platform using a Helm chart.
The workflow is as follows:
-
Download the Ansible plug-ins files.
-
Create a plug-in registry in your OpenShift cluster to host the Ansible plug-ins.
-
Add the plug-ins to the Helm chart.
-
Create a custom ConfigMap.
-
Add your custom ConfigMap to your Helm chart.
-
Edit your custom ConfigMap and Helm chart according to the required and optional configuration procedures.
NoteYou can save changes to your Helm and ConfigMap after each update to your configuration. You do not have to make all the changes to these files in a single session.
2.1. Prerequisites
-
Red Hat Developer Hub installed on Red Hat OpenShift Container Platform.
-
For Helm installation, follow the steps in the Installing Red Hat Developer Hub on OpenShift Container Platform with the Helm chart section of Installing Red Hat Developer Hub on OpenShift Container Platform.
-
For Operator installation, follow the steps in the Installing Red Hat Developer Hub on OpenShift Container Platform with the Operator section of Installing Red Hat Developer Hub on OpenShift Container Platform.
-
-
A valid subscription to Red Hat Ansible Automation Platform.
-
An OpenShift Container Platform instance with the appropriate permissions within your project to create an application.
-
The Red Hat Developer Hub instance can query the automation controller API.
-
Optional: To use the integrated learning paths, you must have outbound access to developers.redhat.com.
2.2. Recommended RHDH preconfiguration
Red Hat recommends performing the following initial configuration tasks in RHDH. However, you can install the Ansible plug-ins for Red Hat Developer Hub before completing these tasks.
|
Note
|
Red Hat provides a repository of software templates for RHDH that uses the |
2.3. Downloading the Ansible plug-ins files
-
Download the latest
.tarfile for the plug-ins from the Red Hat Ansible Automation Platform Product Software downloads page. The format of the filename isansible-backstage-rhaap-bundle-x.y.z.tar.gz. Substitute the Ansible plug-ins release version, for example1.0.0, forx.y.z. -
Create a directory on your local machine to store the
.tarfiles.$ mkdir /path/to/<ansible-backstage-plugins-local-dir-changeme>
-
Set an environment variable (
$DYNAMIC_PLUGIN_ROOT_DIR) to represent the directory path.$ export DYNAMIC_PLUGIN_ROOT_DIR=/path/to/<ansible-backstage-plugins-local-dir-changeme>
-
Extract the
ansible-backstage-rhaap-bundle-<version-number>.tar.gzcontents to$DYNAMIC_PLUGIN_ROOT_DIR.$ tar --exclude='*code*' -xzf ansible-backstage-rhaap-bundle-x.y.z.tar.gz -C $DYNAMIC_PLUGIN_ROOT_DIR
Substitute the Ansible plug-ins release version, for example
1.0.0, forx.y.z.
Run ls to verify that the extracted files are in the $DYNAMIC_PLUGIN_ROOT_DIR directory:
$ ls $DYNAMIC_PLUGIN_ROOT_DIR
ansible-plugin-backstage-rhaap-x.y.z.tgz
ansible-plugin-backstage-rhaap-x.y.z.tgz.integrity
ansible-plugin-backstage-rhaap-backend-x.y.z.tgz
ansible-plugin-backstage-rhaap-backend-x.y.z.tgz.integrity
ansible-plugin-scaffolder-backend-module-backstage-rhaap-x.y.z.tgz
ansible-plugin-scaffolder-backend-module-backstage-rhaap-x.y.z.tgz.integrity
The files with the .integrity file type contain the plugin SHA value.
The SHA value is used during the plug-in configuration.
2.4. Creating a registry for the Ansible plug-ins
Set up a registry in your OpenShift cluster to host the Ansible plug-ins and make them available for installation in Red Hat Developer Hub (RHDH).
-
Log in to your OpenShift Container Platform instance with credentials to create a new application.
-
Open your Red Hat Developer Hub OpenShift project.
$ oc project <YOUR_DEVELOPER_HUB_PROJECT>
-
Run the following commands to create a plug-in registry build in the OpenShift cluster.
$ oc new-build httpd --name=plugin-registry --binary
$ oc start-build plugin-registry --from-dir=$DYNAMIC_PLUGIN_ROOT_DIR --wait
$ oc new-app --image-stream=plugin-registry
To verify that the plugin-registry was deployed successfully, open the Topology view in the Developer perspective on the Red Hat Developer Hub application in the OpenShift Web console.
-
Click the plug-in registry to view the log.
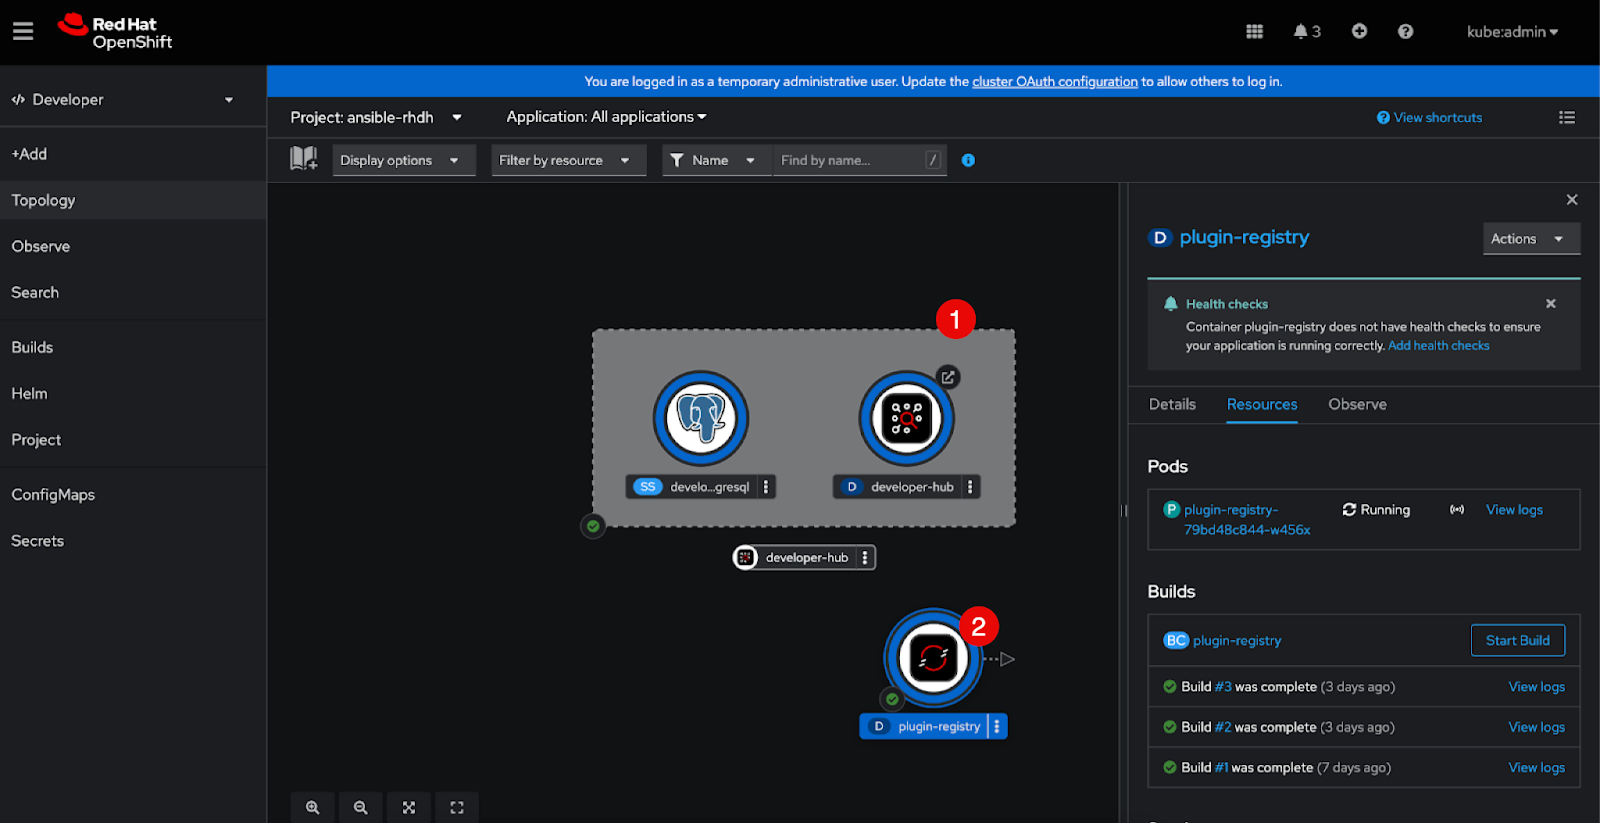
(1) Developer hub instance
(2) Plug-in registry
-
Click the terminal tab and login to the container.
-
In the terminal, run
lsto confirm that the .tar files are in the plugin registry.ansible-plugin-backstage-rhaap-x.y.z.tgz ansible-plugin-backstage-rhaap-backend-x.y.z.tgz ansible-plugin-scaffolder-backend-module-backstage-rhaap-x.y.z.tgz
The version numbers and file names can differ.
2.5. Required configuration
2.5.1. Adding the Ansible plug-ins configuration
-
In the OpenShift Developer UI, navigate to .
-
Update the Helm chart configuration to add the dynamic plug-ins in the Red Hat Developer Hub instance. Under the
pluginssection in the YAML file, add the dynamic plug-ins that you want to enable.global: ... plugins: - disabled: false integrity: <SHA512 Integrity key for ansible-plugin-backstage-rhaap plugin> package: 'http://plugin-registry:8080/ansible-plugin-backstage-rhaap-x.y.z.tgz' pluginConfig: dynamicPlugins: frontend: ansible.plugin-backstage-rhaap: appIcons: - importName: AnsibleLogo name: AnsibleLogo dynamicRoutes: - importName: AnsiblePage menuItem: icon: AnsibleLogo text: Ansible path: /ansible - disabled: false integrity: <SHA512 Integrity key for ansible-plugin-scaffolder-backend-module-backstage-rhaap plugin> package: >- http://plugin-registry:8080/ansible-plugin-scaffolder-backend-module-backstage-rhaap-x.y.z.tgz pluginConfig: dynamicPlugins: backend: ansible.plugin-scaffolder-backend-module-backstage-rhaap: null - disabled: false integrity: <SHA512 Integrity key for ansible-plugin-backstage-rhaap-backend plugin> package: >- http://plugin-registry:8080/ansible-plugin-backstage-rhaap-backend-x.y.z.tgz pluginConfig: dynamicPlugins: backend: ansible.plugin-backstage-rhaap-backend: null -
In the
packagesections, replacex.y.zin the plug-in filenames with the correct version numbers for the Ansible plug-ins. -
For each Ansible plug-in, update the integrity values using the corresponding
.integrityfile content. -
Click Upgrade.
The developer hub pods restart and the plug-ins are installed.
To verify that the plug-ins have been installed, open the install-dynamic-plugin container logs and check that the Ansible plug-ins are visible in Red Hat Developer Hub:
-
Open the Developer perspective for the Red Hat Developer Hub application in the OpenShift Web console.
-
Select the Topology view.
-
Select the Red Hat Developer Hub deployment pod to open an information pane.
-
Select the Resources tab of the information pane.
-
In the Pods section, click View logs to open the Pod details page.
-
In the Pod details page, select the Logs tab.
-
Select
install-dynamic-pluginsfrom the drop-down list of containers to view the container log. -
In the
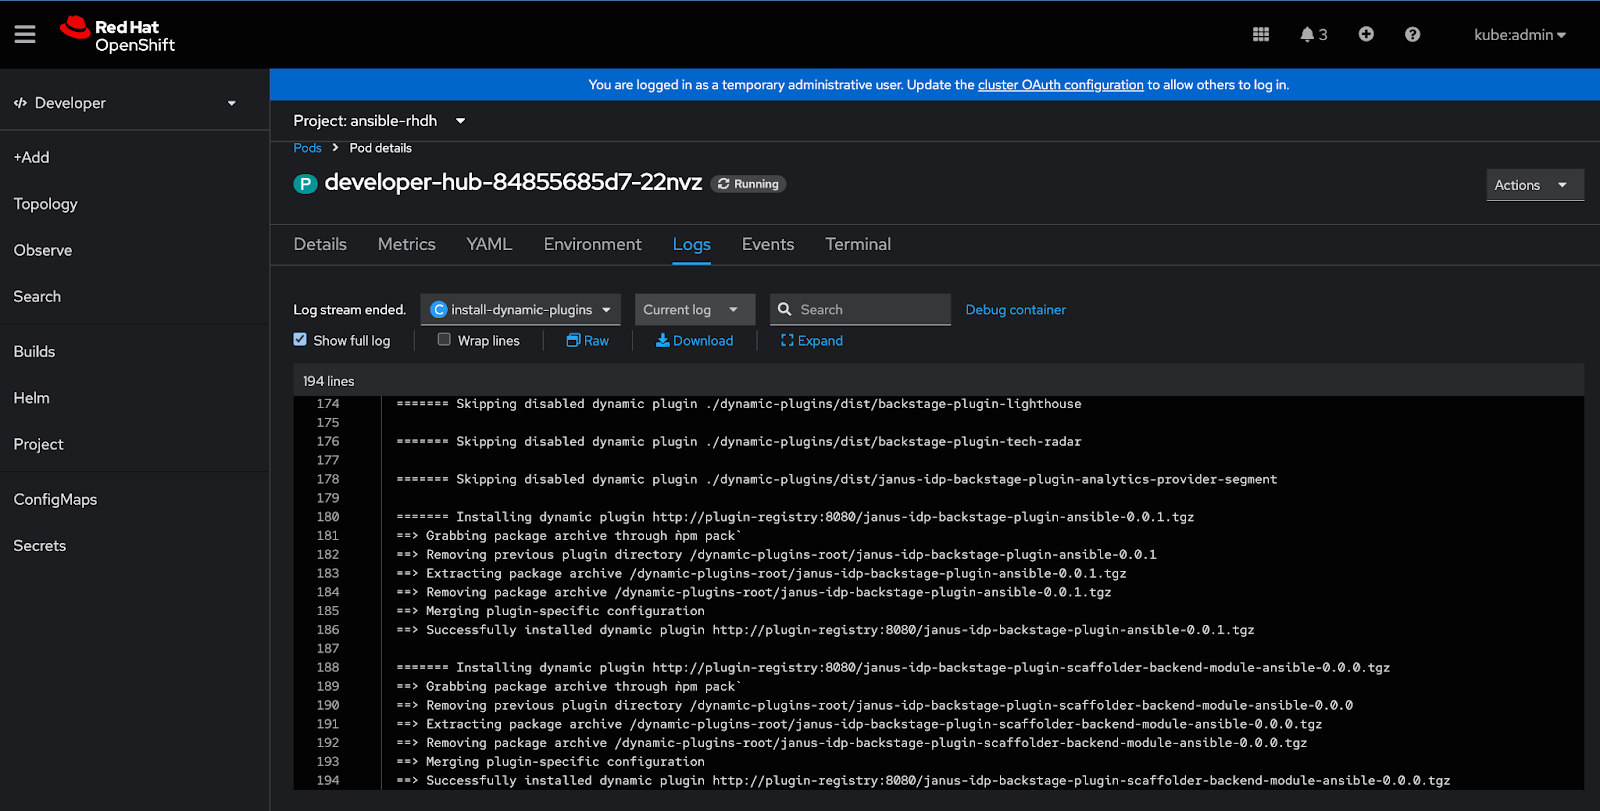
install-dynamic-plugincontainer logs, search for the Ansible plug-ins.The following example from the log indicates a successful installation for one of the plug-ins:
=> Successfully installed dynamic plugin http://plugin-registry-1:8080/ansible-plugin-backstage-rhaap-1.1.0.tgz
The following image shows the container log in the Pod details page. The version numbers and file names can differ.
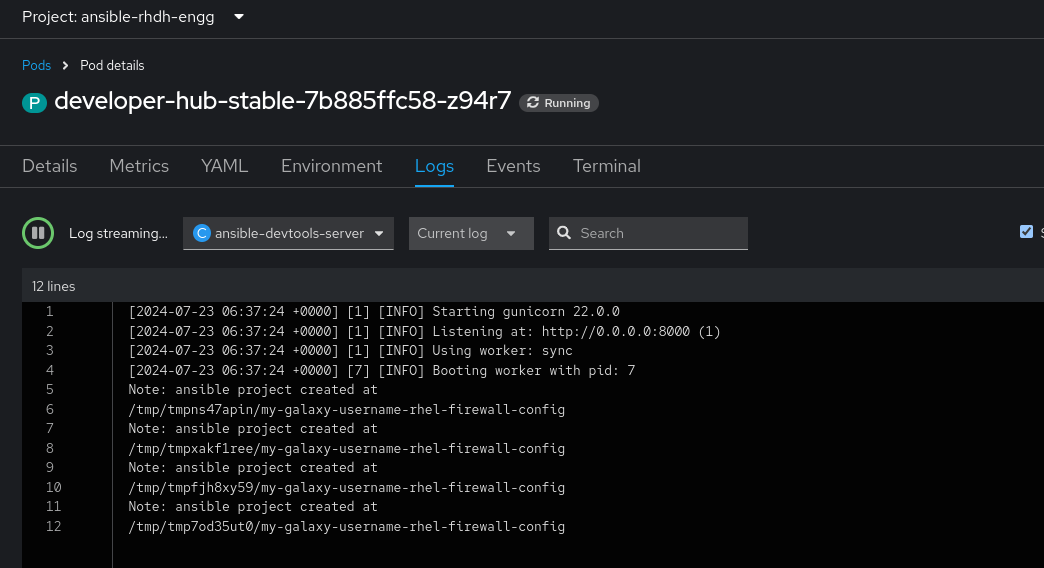
2.5.2. Adding the Ansible Development Tools sidecar container
After the plug-ins are loaded, add the Ansible Development Container (ansible-devtools-server) in the Red Hat Developer Hub pod as a sidecar container.
Adding a pull secret to the Red Hat Developer Hub Helm configuration
The Ansible Development Container download requires a Red Hat Customer Portal account and Red Hat Service Registry account.
-
Create a new Red Hat Registry Service account, if required.
-
Click the token name under the Account name column.
-
Select the OpenShift Secret tab and follow the instructions to add the pull secret to your Red Hat Developer Hub OpenShift project.
-
Add the new secret to the Red Hat Developer Hub Helm configuration, replacing
<your-redhat-registry-pull-secret>with the name of the secret you generated on the Red Hat Registry Service Account website:upstream: backstage: ... image: ... pullSecrets: - <your-redhat-registry-pull-secret> ...
For more information, refer to the Red Hat Container Registry documentation.
Adding the Ansible Developer Tools container
You must update the Helm chart configuration to add an extra container.
-
Log in to the OpenShift UI.
-
Navigate to to open the Helm chart.
-
Update the
extraContainerssection in the YAML file.Add the following code:
upstream: backstage: ... extraContainers: - command: - adt - server image: >- registry.redhat.io/ansible-automation-platform-25/ansible-dev-tools-rhel8:latest imagePullPolicy: IfNotPresent name: ansible-devtools-server ports: - containerPort: 8000 ...NoteThe image pull policy is
imagePullPolicy: IfNotPresent. The image is pulled only if it does not already exist on the node. Update it toimagePullPolicy: Alwaysif you always want to use the latest image. -
Click Upgrade.
To verify that the container is running, check the container log:
2.5.3. Adding a custom ConfigMap
Create a Red Hat Developer Hub ConfigMap following the procedure in
Adding a custom application configuration file to Red Hat OpenShift Container Platform
in the Administration guide for Red Hat Developer Hub.
The examples below use a custom ConfigMap named app-config-rhdh
To edit your custom ConfigMap, log in to the OpenShift UI and navigate to .
2.5.4. Configuring the Ansible Dev Tools Server
The creatorService URL is required for the Ansible plug-ins to provision new projects using the provided software templates.
-
Edit your custom Red Hat Developer Hub config map,
app-config-rhdh, that you created in Adding a custom ConfigMap. -
Add the following code to your Red Hat Developer Hub
app-config-rhdh.yamlfile.kind: ConfigMap apiVersion: v1 metadata: name: app-config-rhdh ... data: app-config-rhdh.yaml: |- ansible: creatorService: baseUrl: 127.0.0.1 port: '8000' ...
2.5.5. Configuring Ansible Automation Platform details
The Ansible plug-ins query your Ansible Automation Platform subscription status with the controller API using a token.
|
Note
|
The Ansible plug-ins continue to function regardless of the Ansible Automation Platform subscription status. |
-
Create a Personal Access Token (PAT) with “Read” scope in automation controller, following the Applications section of Access management and authentication.
-
Edit your custom Red Hat Developer Hub config map, for example
app-config-rhdh. -
Add your Ansible Automation Platform details to
app-config-rhdh.yaml.-
Set the
baseURLkey with your automation controller URL. -
Set the
tokenkey with the generated token value that you created in Step 1. -
Set the
checkSSLkey totrueorfalse.If
checkSSLis set totrue, the Ansible plug-ins verify whether the SSL certificate is valid.data: app-config-rhdh.yaml: | ... ansible: ... rhaap: baseUrl: '<https://MyControllerUrl>' token: '<AAP Personal Access Token>' checkSSL: true
-
|
Note
|
You are responsible for protecting your Red Hat Developer Hub installation from external and unauthorized access. Manage the backend authentication key like any other secret. Meet strong password requirements, do not expose it in any configuration files, and only inject it into configuration files as an environment variable. |
2.5.6. Adding Ansible plug-ins software templates
Red Hat Ansible provides software templates for Red Hat Developer Hub to provision new playbooks and collection projects based on Ansible best practices.
-
Edit your custom Red Hat Developer Hub config map, for example
app-config-rhdh. -
Add the following code to your Red Hat Developer Hub
app-config-rhdh.yamlfile.
data:
  app-config-rhdh.yaml: |
    catalog:
      ...
      locations:
        ...
        - type: url
          target: https://github.com/ansible/ansible-rhdh-templates/blob/main/all.yaml
          rules:
            - allow: [Template]
For more information, refer to the Managing templates section of the Administration guide for Red Hat Developer Hub.
2.5.7. Configuring Role Based Access Control
Red Hat Developer Hub offers Role-based Access Control (RBAC) functionality. RBAC can then be applied to the Ansible plug-ins content.
Assign the following roles:
-
Members of the
admin:superUsersgroup can select templates in the Create tab of the Ansible plug-ins to create playbook and collection projects. -
Members of the
admin:usersgroup can view templates in the Create tab of the Ansible plug-ins.
The following example adds RBAC to Red Hat Developer Hub.
data:
  app-config-rhdh.yaml: |
    plugins:
    ...
    permission:
      enabled: true
      rbac:
        admin:
          users:
            - name: user:default/<user-scm-ida>
          superUsers:
            - name: user:default/<user-admin-idb>
For more information about permission policies and managing RBAC, refer to the Authorization guide for Red Hat Developer Hub.
2.6. Optional configuration for Ansible plug-ins
2.6.1. Enabling Red Hat Developer Hub authentication
Red Hat Developer Hub (RHDH) provides integrations for multiple Source Control Management (SCM) systems. This is required by the plug-ins to create repositories.
Refer to the Enabling authentication in Red Hat Developer Hub chapter of the Administration guide for Red Hat Developer Hub.
2.6.2. Configuring Ansible plug-ins optional integrations
The Ansible plug-ins provide integrations with Ansible Automation Platform and other optional Red Hat products.
To edit your custom ConfigMap, log in to the OpenShift UI and navigate to .
Configuring OpenShift Dev Spaces
When OpenShift Dev Spaces is configured for the Ansible plug-ins, users can click a link from the catalog item view in Red Hat Developer Hub and edit their provisioned Ansible Git projects using Dev Spaces.
|
Note
|
OpenShift Dev Spaces is a separate product and it is optional. The plug-ins will function without it. It is a separate Red Hat product and is not included in the Ansible Automation Platform or Red Hat Developer Hub subscription. |
If the OpenShift Dev Spaces link is not configured in the Ansible plug-ins, the Go to OpenShift Dev Spaces dashboard link in the DEVELOP section of the Ansible plug-ins landing page redirects users to the Ansible development tools home page.
-
A Dev Spaces installation. Refer to the Installing Dev Spaces section of the Red Hat OpenShift Dev Spaces Administration guide.
-
Edit your custom Red Hat Developer Hub config map, for example
app-config-rhdh. -
Add the following code to your Red Hat Developer Hub
app-config-rhdh.yamlfile.data: app-config-rhdh.yaml: |- ansible: devSpaces: baseUrl: >- https://<Your OpenShift Dev Spaces URL> -
Replace
<Your OpenShft Dev Spaces URL>with your OpenShift Dev Spaces URL. -
In the OpenShift Developer UI, select the
Red Hat Developer Hubpod. -
Open Actions.
-
Click Restart rollout.
Configuring the private automation hub URL
Private automation hub provides a centralized, on-premise repository for certified Ansible collections, execution environments and any additional, vetted content provided by your organization.
If the private automation hub URL is not configured in the Ansible plug-ins, users are redirected to the Red Hat Hybrid Cloud Console automation hub.
|
Note
|
The private automation hub configuration is optional but recommended. The Ansible plug-ins will function without it. |
-
A private automation hub instance.
For more information on installing private automation hub, refer to the installation guides in the Ansible Automation Platform documentation.
-
Edit your custom Red Hat Developer Hub config map, for example
app-config-rhdh. -
Add the following code to your Red Hat Developer Hub
app-config-rhdh.yamlfile.data: app-config-rhdh.yaml: |- ansible: ... automationHub: baseUrl: '<https://MyOwnPAHUrl>' ... -
Replace
<https://MyOwnPAHUrl/>with your private automation hub URL. -
In the OpenShift Developer UI, select the
Red Hat Developer Hubpod. -
Open Actions.
-
Click Restart rollout.
2.7. Full examples
2.7.1. Full app-config-rhdh ConfigMap example for Ansible plug-ins entries
kind: ConfigMap
...
metadata:
  name: app-config-rhdh
  ...
data:
  app-config-rhdh.yaml: |-
    ansible:
      creatorService:
        baseUrl: 127.0.0.1
        port: '8000'
      rhaap:
        baseUrl: '<https://MyControllerUrl>'
        token: '<AAP Personal Access Token>'
        checkSSL: <true or false>
      # Optional integrations
      devSpaces:
        baseUrl: '<https://MyDevSpacesURL>'
      automationHub:
        baseUrl: '<https://MyPrivateAutomationHubURL>'

    ...
    catalog:
      locations:
        - type: url
          target: https://github.com/ansible/ansible-rhdh-templates/blob/main/all.yaml
          rules:
            - allow: [Template]
    ...
2.7.2. Full Helm chart config example for Ansible plug-ins
global:
  ...
  dynamic:
    ...
    plugins:
      - disabled: false
        integrity: <SHA512 Integrity key for ansible-plugin-backstage-rhaap plugin>
        package: 'http://plugin-registry:8080/ansible-plugin-backstage-rhaap-x.y.z.tgz'
        pluginConfig:
          dynamicPlugins:
            frontend:
              ansible.plugin-backstage-rhaap:
                appIcons:
                  - importName: AnsibleLogo
                    name: AnsibleLogo
                dynamicRoutes:
                  - importName: AnsiblePage
                    menuItem:
                      icon: AnsibleLogo
                      text: Ansible
                    path: /ansible
      - disabled: false
        integrity: <SHA512 Integrity key for ansible-plugin-scaffolder-backend-module-backstage-rhaap plugin>
        package: >-
          http://plugin-registry:8080/ansible-plugin-scaffolder-backend-module-backstage-rhaap-x.y.z.tgz
        pluginConfig:
          dynamicPlugins:
            backend:
              ansible.plugin-scaffolder-backend-module-backstage-rhaap: null
      - disabled: false
        integrity: <SHA512 Integrity key for ansible-plugin-backstage-rhaap-backend plugin>
        package: >-
          http://plugin-registry:8080/ansible-plugin-backstage-rhaap-backend-x.y.z.tgz
        pluginConfig:
          dynamicPlugins:
            backend:
              ansible.plugin-backstage-rhaap-backend: null
...
upstream:
  backstage:
    ...
    extraAppConfig:
      - configMapRef: app-config-rhdh
        filename: app-config-rhdh.yaml
    extraContainers:
      - command:
          - adt
          - server
        image: >-
          registry.redhat.io/ansible-automation-platform-25/ansible-dev-tools-rhel8:latest
        imagePullPolicy: IfNotPresent
        name: ansible-devtools-server
        ports:
          - containerPort: 8000
...
3. Installing the Ansible plug-ins with the Operator on OpenShift Container Platform
The following procedures describe how to install Ansible plug-ins in Red Hat Developer Hub instances on Red Hat OpenShift Container Platform using the Operator.
3.1. Prerequisites
-
Red Hat Developer Hub installed on Red Hat OpenShift Container Platform.
-
For Helm installation, follow the steps in the Installing Red Hat Developer Hub on OpenShift Container Platform with the Helm chart section of Installing Red Hat Developer Hub on OpenShift Container Platform.
-
For Operator installation, follow the steps in the Installing Red Hat Developer Hub on OpenShift Container Platform with the Operator section of Installing Red Hat Developer Hub on OpenShift Container Platform.
-
-
A valid subscription to Red Hat Ansible Automation Platform.
-
An OpenShift Container Platform instance with the appropriate permissions within your project to create an application.
-
The Red Hat Developer Hub instance can query the automation controller API.
-
Optional: To use the integrated learning paths, you must have outbound access to developers.redhat.com.
3.2. Recommended RHDH preconfiguration
Red Hat recommends performing the following initial configuration tasks in RHDH. However, you can install the Ansible plug-ins for Red Hat Developer Hub before completing these tasks.
|
Note
|
Red Hat provides a repository of software templates for RHDH that uses the |
3.3. Adding a sidecar container for Ansible development tools to the RHDH Operator Custom Resource
Add a sidecar container for Ansible development tools in the Developer Hub pod. To do this, you must modify the base ConfigMap for the Red Hat Developer Hub deployment.
-
In the OpenShift console, select the Topology view.
-
Click More actions ⋮ on the developer-hub instance and select Edit backstage to open the Backstage details page.
-
Select the YAML tab.
-
In the editing pane, add a
containersblock in thespec.deployment.patch.spec.template.specblock:apiVersion: rhdh.redhat.com/v1alpha3 kind: Backstage metadata: name: developer-hub spec: deployment: patch: spec: template: spec: containers: - command: - adt - server image: ghcr.io/ansible/community-ansible-dev-tools:latest imagePullPolicy: always ports: - containerPort:8000 protocol: TCP terminationMessagePolicy: file -
Click Save.
|
Note
|
If you want to add extra environment variables to your deployment,
you can add them in the spec:
application:
...
extraEnvs:
envs:
- name: <env_variable_name>
value: <env_variable_value>
|
3.4. Downloading the Ansible plug-ins files
-
Download the latest
.tarfile for the plug-ins from the Red Hat Ansible Automation Platform Product Software downloads page. The format of the filename isansible-backstage-rhaap-bundle-x.y.z.tar.gz. Substitute the Ansible plug-ins release version, for example1.0.0, forx.y.z. -
Create a directory on your local machine to store the
.tarfiles.$ mkdir /path/to/<ansible-backstage-plugins-local-dir-changeme>
-
Set an environment variable (
$DYNAMIC_PLUGIN_ROOT_DIR) to represent the directory path.$ export DYNAMIC_PLUGIN_ROOT_DIR=/path/to/<ansible-backstage-plugins-local-dir-changeme>
-
Extract the
ansible-backstage-rhaap-bundle-<version-number>.tar.gzcontents to$DYNAMIC_PLUGIN_ROOT_DIR.$ tar --exclude='*code*' -xzf ansible-backstage-rhaap-bundle-x.y.z.tar.gz -C $DYNAMIC_PLUGIN_ROOT_DIR
Substitute the Ansible plug-ins release version, for example
1.0.0, forx.y.z.
Run ls to verify that the extracted files are in the $DYNAMIC_PLUGIN_ROOT_DIR directory:
$ ls $DYNAMIC_PLUGIN_ROOT_DIR
ansible-plugin-backstage-rhaap-x.y.z.tgz
ansible-plugin-backstage-rhaap-x.y.z.tgz.integrity
ansible-plugin-backstage-rhaap-backend-x.y.z.tgz
ansible-plugin-backstage-rhaap-backend-x.y.z.tgz.integrity
ansible-plugin-scaffolder-backend-module-backstage-rhaap-x.y.z.tgz
ansible-plugin-scaffolder-backend-module-backstage-rhaap-x.y.z.tgz.integrity
The files with the .integrity file type contain the plugin SHA value.
The SHA value is used during the plug-in configuration.
3.5. Creating a registry for the Ansible plug-ins
Set up a registry in your OpenShift cluster to host the Ansible plug-ins and make them available for installation in Red Hat Developer Hub (RHDH).
-
Log in to your OpenShift Container Platform instance with credentials to create a new application.
-
Open your Red Hat Developer Hub OpenShift project.
$ oc project <YOUR_DEVELOPER_HUB_PROJECT>
-
Run the following commands to create a plug-in registry build in the OpenShift cluster.
$ oc new-build httpd --name=plugin-registry --binary
$ oc start-build plugin-registry --from-dir=$DYNAMIC_PLUGIN_ROOT_DIR --wait
$ oc new-app --image-stream=plugin-registry
To verify that the plugin-registry was deployed successfully, open the Topology view in the Developer perspective on the Red Hat Developer Hub application in the OpenShift Web console.
-
Click the plug-in registry to view the log.
(1) Developer hub instance
(2) Plug-in registry
-
Click the terminal tab and login to the container.
-
In the terminal, run
lsto confirm that the .tar files are in the plugin registry.ansible-plugin-backstage-rhaap-x.y.z.tgz ansible-plugin-backstage-rhaap-backend-x.y.z.tgz ansible-plugin-scaffolder-backend-module-backstage-rhaap-x.y.z.tgz
The version numbers and file names can differ.
3.6. Installing the dynamic plug-ins
To install the dynamic plugins, add them to your ConfigMap for your RHDH plugin settings (for example, rhaap-dynamic-plugins-config).
If you have not already created a ConfigMap file for your RHDH plugin settings, create one by following the procedure in Adding a custom application configuration file to Red Hat OpenShift Container Platform section of the Administration guide for Red Hat Developer Hub.
The example ConfigMap used in the following procedure is called rhaap-dynamic-plugins-config.
-
Select ConfigMaps in the navigation pane of the OpenShift console.
-
Select the
rhaap-dynamic-plugins-configConfigMap from the list. -
Select the YAML tab to edit the
rhaap-dynamic-plugins-configConfigMap. -
In the
data.dynamic-plugins.yaml.pluginsblock, add the three dynamic plug-ins from the plug-in registry.-
For the
integrityhash values, use the.integrityfiles in your$DYNAMIC_PLUGIN_ROOT_DIRdirectory that correspond to each plug-in, for example useansible-plugin-backstage-rhaap-x.y.z.tgz.integrityfor theansible-plugin-backstage-rhaap-x.y.z.tgzplug-in. -
Replace
x.y.zwith the correct version of the plug-ins.kind: ConfigMap apiVersion: v1 metadata: name: rhaap-dynamic-plugins-config data: dynamic-plugins.yaml: | ... plugins: - disabled: false package: 'http://plugin-registry:8080/ansible-plugin-backstage-rhaap-x.y.z.tgz' integrity: <SHA512 value> # Use hash in ansible-plugin-backstage-rhaap-x.y.z.tgz.integrity pluginConfig: dynamicPlugins: frontend: ansible.plugin-backstage-rhaap: appIcons: - importName: AnsibleLogo name: AnsibleLogo dynamicRoutes: - importName: AnsiblePage menuItem: icon: AnsibleLogo text: Ansible path: /ansible - disabled: false package: >- http://plugin-registry:8080/ansible-plugin-backstage-rhaap-backend-x.y.z.tgz integrity: <SHA512 value> # Use hash in ansible-plugin-backstage-rhaap-backend-x.y.z.tgz.integrity pluginConfig: dynamicPlugins: backend: ansible.plugin-backstage-rhaap-backend: null - disabled: false package: >- http://plugin-registry:8080/ansible-plugin-scaffolder-backend-module-backstage-rhaap-x.y.z.tgz integrity: <SHA512 value> # Use hash in ansible-plugin-scaffolder-backend-module-backstage-rhaap-x.y.z.tgz.integrity pluginConfig: dynamicPlugins: backend: ansible.plugin-scaffolder-backend-module-backstage-rhaap: null - ...<REDACTED>
-
-
Click Save.
-
To view the progress of the rolling restart:
-
In the Topology view, select the deployment pod and click View logs.
-
Select
install-dynamic-pluginsfrom the list of containers.
-
-
In the OpenShift console, select the Topology view.
-
Click the Open URL icon on the deployment pod to open your Red Hat Developer Hub instance in a browser window.
The Ansible plug-in is present in the navigation pane, and if you select Administration, the installed plug-ins are listed in the Plugins tab.
3.7. Adding a custom ConfigMap
Create a Red Hat Developer Hub ConfigMap following the procedure in
Adding a custom application configuration file to Red Hat OpenShift Container Platform
in the Administration guide for Red Hat Developer Hub.
The examples below use a custom ConfigMap named app-config-rhdh
To edit your custom ConfigMap, log in to the OpenShift UI and navigate to .
3.8. Configuring the Ansible Dev Tools Server
The creatorService URL is required for the Ansible plug-ins to provision new projects using the provided software templates.
-
Edit your custom Red Hat Developer Hub config map,
app-config-rhdh, that you created in Adding a custom ConfigMap. -
Add the following code to your Red Hat Developer Hub
app-config-rhdh.yamlfile.kind: ConfigMap apiVersion: v1 metadata: name: app-config-rhdh ... data: app-config-rhdh.yaml: |- ansible: creatorService: baseUrl: 127.0.0.1 port: '8000' ...
3.9. Configuring Ansible Automation Platform details
The Ansible plug-ins query your Ansible Automation Platform subscription status with the controller API using a token.
|
Note
|
The Ansible plug-ins continue to function regardless of the Ansible Automation Platform subscription status. |
-
Create a Personal Access Token (PAT) with “Read” scope in automation controller, following the Applications section of Access management and authentication.
-
Edit your custom Red Hat Developer Hub config map, for example
app-config-rhdh. -
Add your Ansible Automation Platform details to
app-config-rhdh.yaml.-
Set the
baseURLkey with your automation controller URL. -
Set the
tokenkey with the generated token value that you created in Step 1. -
Set the
checkSSLkey totrueorfalse.If
checkSSLis set totrue, the Ansible plug-ins verify whether the SSL certificate is valid.data: app-config-rhdh.yaml: | ... ansible: ... rhaap: baseUrl: '<https://MyControllerUrl>' token: '<AAP Personal Access Token>' checkSSL: true
-
|
Note
|
You are responsible for protecting your Red Hat Developer Hub installation from external and unauthorized access. Manage the backend authentication key like any other secret. Meet strong password requirements, do not expose it in any configuration files, and only inject it into configuration files as an environment variable. |
3.10. Adding Ansible plug-ins software templates
Red Hat Ansible provides software templates for Red Hat Developer Hub to provision new playbooks and collection projects based on Ansible best practices.
-
Edit your custom Red Hat Developer Hub config map, for example
app-config-rhdh. -
Add the following code to your Red Hat Developer Hub
app-config-rhdh.yamlfile.
data:
  app-config-rhdh.yaml: |
    catalog:
      ...
      locations:
        ...
        - type: url
          target: https://github.com/ansible/ansible-rhdh-templates/blob/main/all.yaml
          rules:
            - allow: [Template]
For more information, refer to the Managing templates section of the Administration guide for Red Hat Developer Hub.
3.11. Configuring Role Based Access Control
Red Hat Developer Hub offers Role-based Access Control (RBAC) functionality. RBAC can then be applied to the Ansible plug-ins content.
Assign the following roles:
-
Members of the
admin:superUsersgroup can select templates in the Create tab of the Ansible plug-ins to create playbook and collection projects. -
Members of the
admin:usersgroup can view templates in the Create tab of the Ansible plug-ins.
The following example adds RBAC to Red Hat Developer Hub.
data:
  app-config-rhdh.yaml: |
    plugins:
    ...
    permission:
      enabled: true
      rbac:
        admin:
          users:
            - name: user:default/<user-scm-ida>
          superUsers:
            - name: user:default/<user-admin-idb>
For more information about permission policies and managing RBAC, refer to the Authorization guide for Red Hat Developer Hub.
3.12. Optional configuration for Ansible plug-ins
3.12.1. Enabling Red Hat Developer Hub authentication
Red Hat Developer Hub (RHDH) provides integrations for multiple Source Control Management (SCM) systems. This is required by the plug-ins to create repositories.
Refer to the Enabling authentication in Red Hat Developer Hub chapter of the Administration guide for Red Hat Developer Hub.
3.12.2. Configuring Ansible plug-ins optional integrations
The Ansible plug-ins provide integrations with Ansible Automation Platform and other optional Red Hat products.
To edit your custom ConfigMap, log in to the OpenShift UI and navigate to .
Configuring OpenShift Dev Spaces
When OpenShift Dev Spaces is configured for the Ansible plug-ins, users can click a link from the catalog item view in Red Hat Developer Hub and edit their provisioned Ansible Git projects using Dev Spaces.
|
Note
|
OpenShift Dev Spaces is a separate product and it is optional. The plug-ins will function without it. It is a separate Red Hat product and is not included in the Ansible Automation Platform or Red Hat Developer Hub subscription. |
If the OpenShift Dev Spaces link is not configured in the Ansible plug-ins, the Go to OpenShift Dev Spaces dashboard link in the DEVELOP section of the Ansible plug-ins landing page redirects users to the Ansible development tools home page.
-
A Dev Spaces installation. Refer to the Installing Dev Spaces section of the Red Hat OpenShift Dev Spaces Administration guide.
-
Edit your custom Red Hat Developer Hub config map, for example
app-config-rhdh. -
Add the following code to your Red Hat Developer Hub
app-config-rhdh.yamlfile.data: app-config-rhdh.yaml: |- ansible: devSpaces: baseUrl: >- https://<Your OpenShift Dev Spaces URL> -
Replace
<Your OpenShft Dev Spaces URL>with your OpenShift Dev Spaces URL. -
In the OpenShift Developer UI, select the
Red Hat Developer Hubpod. -
Open Actions.
-
Click Restart rollout.
Configuring the private automation hub URL
Private automation hub provides a centralized, on-premise repository for certified Ansible collections, execution environments and any additional, vetted content provided by your organization.
If the private automation hub URL is not configured in the Ansible plug-ins, users are redirected to the Red Hat Hybrid Cloud Console automation hub.
|
Note
|
The private automation hub configuration is optional but recommended. The Ansible plug-ins will function without it. |
-
A private automation hub instance.
For more information on installing private automation hub, refer to the installation guides in the Ansible Automation Platform documentation.
-
Edit your custom Red Hat Developer Hub config map, for example
app-config-rhdh. -
Add the following code to your Red Hat Developer Hub
app-config-rhdh.yamlfile.data: app-config-rhdh.yaml: |- ansible: ... automationHub: baseUrl: '<https://MyOwnPAHUrl>' ... -
Replace
<https://MyOwnPAHUrl/>with your private automation hub URL. -
In the OpenShift Developer UI, select the
Red Hat Developer Hubpod. -
Open Actions.
-
Click Restart rollout.
3.13. Full app-config-rhdh ConfigMap example for Ansible plug-ins entries
kind: ConfigMap
...
metadata:
  name: app-config-rhdh
  ...
data:
  app-config-rhdh.yaml: |-
    ansible:
      creatorService:
        baseUrl: 127.0.0.1
        port: '8000'
      rhaap:
        baseUrl: '<https://MyControllerUrl>'
        token: '<AAP Personal Access Token>'
        checkSSL: <true or false>
      # Optional integrations
      devSpaces:
        baseUrl: '<https://MyDevSpacesURL>'
      automationHub:
        baseUrl: '<https://MyPrivateAutomationHubURL>'

    ...
    catalog:
      locations:
        - type: url
          target: https://github.com/ansible/ansible-rhdh-templates/blob/main/all.yaml
          rules:
            - allow: [Template]
    ...
4. Ansible plug-ins subscription warning messages
The Ansible plug-ins display a subscription warning banner in the user interface in the following scenarios:
4.1. Unable to connect to Ansible Automation Platform
The following warning indicates that the automation controller details are not configured, or the controller instance API is unreachable to query the subscription status.
Unable to connect to Ansible Automation Platform
Verify that Ansible Automation Platform is reachable and correctly configured in the Ansible plug-ins.
To get help, please refer to the Ansible plug-ins installation guide.
Remediation steps
-
Verify that Ansible Automation Platform is reachable and correctly configured in the
rhaapsection of the ConfigMap. -
Ensure the
checkSSLkey is correctly set for your environment. -
After correcting the configuration details, restart the Red Hat Developer Hub pod to initiate a subscription query.
4.2. Unable to authenticate to Ansible Automation Platform
The following warning indicates that the Ansible plug-ins were not able to authenticate with Ansible Automation Platform to query the subscription status.
Unable to authenticate to Ansible Automation Platform
Verify that the authentication details for Ansible Automation Platform are correctly configured in the Ansible plug-ins.
For help, please refer to the Ansible plug-ins installation guide.
Remediation steps
-
Verify that the automation controller Personal Access Token (PAT) configured in the Ansible plug-ins is correct. For more information, refer to the Adding tokens section of TitleCentralAuth.
-
After correcting the authentication details, restart the Red Hat Developer Hub pod to initiate a subscription query.
4.3. Invalid Ansible Automation Platform configuration
The following warning indicates that the Ansible Automation Platform configuration section is invalid or incomplete.
Invalid resource for Ansible Automation Platform
Verify that the resource url for Ansible Automation Platform are correctly configured in the Ansible plug-ins.
For help, please refer to the Ansible plug-ins installation guide.
Remediation steps
-
Verify that the
rhaapsection of the Ansible plug-ins ConfigMap is correctly configured and contains all the necessary entries. For more information, refer to Configuring Ansible Automation Platform details. -
After correcting the configuration, restart the Red Hat Developer Hub pod to initiate a subscription query.
4.4. Ansible Automation Platform subscription is out of compliance
The following warning indicates that the Ansible plug-ins successfully retrieved the Ansible Automation Platform subscription status. However, the subscription is out of compliance.
Subscription non-compliant
The connected Ansible Automation Platform subscription is out of compliance.
Contact your Red Hat account team to obtain a new subscription entitlement.
Learn more about account compliance.
Remediation steps
-
Contact your Red Hat account team to obtain a new subscription entitlement.
-
Learn more about account compliance.
-
When the subscription is in compliance, restart the Red Hat Developer Hub pod to initiate a new subscription query.
4.5. Invalid Ansible Automation Platform subscription
The following warning indicates that the Ansible plug-ins successfully retrieved the Ansible Automation Platform subscription status. However, the subscription type is invalid for Ansible Automation Platform.
Invalid subscription
The connected Ansible Automation Platform subscription is invalid.
Contact your Red Hat account team, or start an Ansible Automation Platform trial.
Remediation steps
-
Contact your Red Hat account team to obtain a new subscription entitlement or start an Ansible Automation Platform trial.
-
When you have updated the subscription, restart the Red Hat Developer Hub pod to initiate a new subscription query.
5. Upgrading the Ansible plug-ins on a Helm installation on OpenShift Container Platform
To upgrade the Ansible plug-ins, you must update the plugin-registry application with the latest Ansible plug-ins files.
5.1. Downloading the Ansible plug-ins files
-
Download the latest
.tarfile for the plug-ins from the Red Hat Ansible Automation Platform Product Software downloads page. The format of the filename isansible-backstage-rhaap-bundle-x.y.z.tar.gz. Substitute the Ansible plug-ins release version, for example1.0.0, forx.y.z. -
Create a directory on your local machine to store the
.tarfiles.$ mkdir /path/to/<ansible-backstage-plugins-local-dir-changeme>
-
Set an environment variable (
$DYNAMIC_PLUGIN_ROOT_DIR) to represent the directory path.$ export DYNAMIC_PLUGIN_ROOT_DIR=/path/to/<ansible-backstage-plugins-local-dir-changeme>
-
Extract the
ansible-backstage-rhaap-bundle-<version-number>.tar.gzcontents to$DYNAMIC_PLUGIN_ROOT_DIR.$ tar --exclude='*code*' -xzf ansible-backstage-rhaap-bundle-x.y.z.tar.gz -C $DYNAMIC_PLUGIN_ROOT_DIR
Substitute the Ansible plug-ins release version, for example
1.0.0, forx.y.z.
Run ls to verify that the extracted files are in the $DYNAMIC_PLUGIN_ROOT_DIR directory:
$ ls $DYNAMIC_PLUGIN_ROOT_DIR
ansible-plugin-backstage-rhaap-x.y.z.tgz
ansible-plugin-backstage-rhaap-x.y.z.tgz.integrity
ansible-plugin-backstage-rhaap-backend-x.y.z.tgz
ansible-plugin-backstage-rhaap-backend-x.y.z.tgz.integrity
ansible-plugin-scaffolder-backend-module-backstage-rhaap-x.y.z.tgz
ansible-plugin-scaffolder-backend-module-backstage-rhaap-x.y.z.tgz.integrity
The files with the .integrity file type contain the plugin SHA value.
The SHA value is used during the plug-in configuration.
5.2. Updating the plug-in registry
Rebuild your plug-in registry application in your OpenShift cluster with the latest Ansible plug-ins files.
-
You have downloaded the Ansible plug-ins files.
-
You have set an environment variable, for example (
$DYNAMIC_PLUGIN_ROOT_DIR), to represent the path to the local directory where you have stored the.tarfiles.
-
Log in to your OpenShift Container Platform instance with credentials to create a new application.
-
Open your Red Hat Developer Hub OpenShift project.
$ oc project <YOUR_DEVELOPER_HUB_PROJECT>
-
Run the following commands to update your plug-in registry build in the OpenShift cluster. The commands assume that
$DYNAMIC_PLUGIN_ROOT_DIRrepresents the directory for your.tarfiles. Replace this in the command if you have chosen a different environment variable name.$ oc start-build plugin-registry --from-dir=$DYNAMIC_PLUGIN_ROOT_DIR --wait
$ oc start-build plugin-registry --from-dir=$DYNAMIC_PLUGIN_ROOT_DIR --wait
-
When the registry has started, the output displays the following message:
Uploading directory "/path/to/dynamic_plugin_root" as binary input for the build …
Uploading finished
build.build.openshift.io/plugin-registry-1 started
Verify that the plugin-registry has been updated.
-
In the OpenShift UI, click Topology.
-
Click the redhat-developer-hub icon to view the pods for the plug-in registry.
-
Click View logs for the plug-in registry pod.
-
Open the Terminal tab and run
lsto view the.tarfiles in theplug-in registry. -
Verify that the new
.tarfile has been uploaded.
5.3. Updating the Ansible plug-ins version numbers for a Helm installation
-
Log in to your OpenShift Container Platform instance.
-
In the OpenShift Developer UI, navigate to .
-
Update the Ansible plug-ins version numbers and associated
.integrityfile values.... global: ... plugins: - disabled: false integrity: <SHA512 value> package: 'http://plugin-registry:8080/ansible-plugin-backstage-rhaap-x.y.z.tgz' pluginConfig: dynamicPlugins: frontend: ansible.plugin-backstage-rhaap: appIcons: - importName: AnsibleLogo name: AnsibleLogo dynamicRoutes: - importName: AnsiblePage menuItem: icon: AnsibleLogo text: Ansible path: /ansible - disabled: false integrity: <SHA512 value> package: >- http://plugin-registry:8080/ansible-plugin-scaffolder-backend-module-backstage-rhaap-x.y.z.tgz pluginConfig: dynamicPlugins: backend: ansible.plugin-scaffolder-backend-module-backstage-rhaap: null - disabled: false integrity: <SHA512 value> package: >- http://plugin-registry:8080/ansible-plugin-backstage-rhaap-backend-x.y.z.tgz pluginConfig: dynamicPlugins: backend: ansible.plugin-backstage-rhaap-backend: null -
Click Upgrade.
The developer hub pods restart and the plug-ins are installed.
-
In the OpenShift UI, click Topology.
-
Make sure that the Red Hat Developer Hub instance is available.
6. Upgrading the Ansible plug-ins on an Operator installation on OpenShift Container Platform
To upgrade the Ansible plug-ins, you must update the plugin-registry application with the latest Ansible plug-ins files.
6.1. Downloading the Ansible plug-ins files
-
Download the latest
.tarfile for the plug-ins from the Red Hat Ansible Automation Platform Product Software downloads page. The format of the filename isansible-backstage-rhaap-bundle-x.y.z.tar.gz. Substitute the Ansible plug-ins release version, for example1.0.0, forx.y.z. -
Create a directory on your local machine to store the
.tarfiles.$ mkdir /path/to/<ansible-backstage-plugins-local-dir-changeme>
-
Set an environment variable (
$DYNAMIC_PLUGIN_ROOT_DIR) to represent the directory path.$ export DYNAMIC_PLUGIN_ROOT_DIR=/path/to/<ansible-backstage-plugins-local-dir-changeme>
-
Extract the
ansible-backstage-rhaap-bundle-<version-number>.tar.gzcontents to$DYNAMIC_PLUGIN_ROOT_DIR.$ tar --exclude='*code*' -xzf ansible-backstage-rhaap-bundle-x.y.z.tar.gz -C $DYNAMIC_PLUGIN_ROOT_DIR
Substitute the Ansible plug-ins release version, for example
1.0.0, forx.y.z.
Run ls to verify that the extracted files are in the $DYNAMIC_PLUGIN_ROOT_DIR directory:
$ ls $DYNAMIC_PLUGIN_ROOT_DIR
ansible-plugin-backstage-rhaap-x.y.z.tgz
ansible-plugin-backstage-rhaap-x.y.z.tgz.integrity
ansible-plugin-backstage-rhaap-backend-x.y.z.tgz
ansible-plugin-backstage-rhaap-backend-x.y.z.tgz.integrity
ansible-plugin-scaffolder-backend-module-backstage-rhaap-x.y.z.tgz
ansible-plugin-scaffolder-backend-module-backstage-rhaap-x.y.z.tgz.integrity
The files with the .integrity file type contain the plugin SHA value.
The SHA value is used during the plug-in configuration.
6.2. Updating the plug-in registry
Rebuild your plug-in registry application in your OpenShift cluster with the latest Ansible plug-ins files.
-
You have downloaded the Ansible plug-ins files.
-
You have set an environment variable, for example (
$DYNAMIC_PLUGIN_ROOT_DIR), to represent the path to the local directory where you have stored the.tarfiles.
-
Log in to your OpenShift Container Platform instance with credentials to create a new application.
-
Open your Red Hat Developer Hub OpenShift project.
$ oc project <YOUR_DEVELOPER_HUB_PROJECT>
-
Run the following commands to update your plug-in registry build in the OpenShift cluster. The commands assume that
$DYNAMIC_PLUGIN_ROOT_DIRrepresents the directory for your.tarfiles. Replace this in the command if you have chosen a different environment variable name.$ oc start-build plugin-registry --from-dir=$DYNAMIC_PLUGIN_ROOT_DIR --wait
$ oc start-build plugin-registry --from-dir=$DYNAMIC_PLUGIN_ROOT_DIR --wait
-
When the registry has started, the output displays the following message:
Uploading directory "/path/to/dynamic_plugin_root" as binary input for the build …
Uploading finished
build.build.openshift.io/plugin-registry-1 started
Verify that the plugin-registry has been updated.
-
In the OpenShift UI, click Topology.
-
Click the redhat-developer-hub icon to view the pods for the plug-in registry.
-
Click View logs for the plug-in registry pod.
-
Open the Terminal tab and run
lsto view the.tarfiles in theplug-in registry. -
Verify that the new
.tarfile has been uploaded.
6.3. Updating the Ansible plug-ins version numbers for an Operator installation
-
Log in to your OpenShift Container Platform instance.
-
In the OpenShift UI, open the ConfigMap where you added the Ansible plug-ins during installation. This example uses a ConfigMap file called
rhaap-dynamic-plugins-config. -
Update
x.y.zwith the version numbers for the updated Ansible plug-ins. -
Update the integrity values for each plug-in with the
.integrityvalue from the corresponding extracted Ansible plug-ins.tarfile.kind: ConfigMap apiVersion: v1 metadata: name: rhaap-dynamic-plugins-config data: dynamic-plugins.yaml: | ... plugins: # Update the Ansible plug-in entries below with the updated plugin versions - disabled: false package: 'http://plugin-registry:8080/ansible-plugin-backstage-rhaap-x.y.z.tgz' integrity: <SHA512 value> # Use hash in ansible-plugin-backstage-rhaap-x.y.z.tgz.integrity ... - disabled: false package: >- http://plugin-registry:8080/ansible-plugin-backstage-rhaap-backend-x.y.z.tgz integrity: <SHA512 value> # Use hash in ansible-plugin-backstage-rhaap-backend-x.y.z.tgz.integrity ... - disabled: false package: >- http://plugin-registry:8080/ansible-plugin-scaffolder-backend-module-backstage-rhaap-x.y.z.tgz integrity: <SHA512 value> # Use hash in ansible-plugin-scaffolder-backend-module-backstage-rhaap-x.y.z.tgz.integrity ... -
Click Save.
The developer hub pods restart and the plug-ins are installed.
-
In the OpenShift UI, click Topology.
-
Make sure that the Red Hat Developer Hub instance is available.
7. Uninstalling the Ansible plug-ins from a Helm installation on OpenShift Container Platform
To uninstall the Ansible plug-ins, you must remove any software templates that use the ansible:content:create action from Red Hat Developer Hub, and remove the plug-ins configuration from the Helm chart in OpenShift.
7.1. Uninstalling a Helm chart installation
-
In Red Hat Developer Hub, remove any software templates that use the
ansible:content:createaction. -
In the OpenShift Developer UI, navigate to .
-
Remove the Ansible plug-ins configuration under the
pluginssection.... global: ... plugins: - disabled: false integrity: <SHA512 value> package: 'http://plugin-registry:8080/ansible-plugin-backstage-rhaap-x.y.z.tgz' pluginConfig: dynamicPlugins: frontend: ansible.plugin-backstage-rhaap: appIcons: - importName: AnsibleLogo name: AnsibleLogo dynamicRoutes: - importName: AnsiblePage menuItem: icon: AnsibleLogo text: Ansible path: /ansible - disabled: false integrity: <SHA512 value> package: >- http://plugin-registry:8080/ansible-plugin-scaffolder-backend-module-backstage-rhaap-x.y.z.tgz pluginConfig: dynamicPlugins: backend: ansible.plugin-scaffolder-backend-module-backstage-rhaap: null - disabled: false integrity: <SHA512 value> package: >- http://plugin-registry:8080/ansible-plugin-backstage-rhaap-backend-x.y.z.tgz pluginConfig: dynamicPlugins: backend: ansible.plugin-backstage-rhaap-backend: null -
Remove the
extraContainerssection.upstream: backstage: | ... extraContainers: - command: - adt - server image: >- registry.redhat.io/ansible-automation-platform-25/ansible-dev-tools-rhel8:latest imagePullPolicy: IfNotPresent name: ansible-devtools-server ports: - containerPort: 8000 image: pullPolicy: Always pullSecrets: - ... - rhdh-secret-registry ... -
Click Upgrade.
-
Edit your custom Red Hat Developer Hub config map, for example
app-config-rhdh. -
Remove the
ansiblesection.data: app-config-rhdh.yaml: | ... ansible: analytics: enabled: true devSpaces: baseUrl: '<https://MyOwnDevSpacesUrl/>' creatorService: baseUrl: '127.0.0.1' port: '8000' rhaap: baseUrl: '<https://MyAapSubcriptionUrl>' token: '<TopSecretAAPToken>' checkSSL: true automationHub: baseUrl: '<https://MyOwnPAHUrl/>' -
Restart the Red Hat Developer Hub deployment.
-
Remove the
plugin-registryOpenShift application.oc delete all -l app=plugin-registry
8. Uninstalling an Operator installation on OpenShift Container Platform
To delete the dynamic plug-ins from your installation, you must edit the ConfigMaps that reference Ansible.
The deployment auto reloads when the ConfigMaps are updated. You do not need to reload the deployment manually.
8.1. Removing the Ansible plug-ins from the ConfigMap
-
Open the custom ConfigMap where you referenced the Ansible plug-ins. For this example, the ConfigMap name is
rhaap-dynamic-plugins-config. -
Locate the dynamic plug-ins in the
plugins:block.-
To disable the plug-ins, update the
disabledattribute totruefor the three plug-ins. -
To delete the plug-ins, delete the lines that reference the plug-ins from the
plugins:block:kind: ConfigMap apiVersion: v1 metadata: name: rhaap-dynamic-plugins-config data: dynamic-plugins.yaml: | ... plugins: # Remove the Ansible plug-ins entries below the ‘plugins’ YAML key - disabled: false package: 'http://plugin-registry:8080/ansible-plugin-backstage-rhaap-x.y.z.tgz' integrity: <SHA512 value> ... - disabled: false package: >- http://plugin-registry:8080/ansible-plugin-backstage-rhaap-backend-x.y.z.tgz integrity: <SHA512 value> ... - disabled: false package: >- http://plugin-registry:8080/ansible-plugin-scaffolder-backend-module-backstage-rhaap-x.y.z.tgz integrity: <SHA512 value> ...
-
-
Click Save.
8.2. Removing Ansible Automation Platform and Dev Spaces from the custom Red Hat Developer Hub ConfigMap
-
Open the custom Red Hat Developer Hub ConfigMap where you added configuration for the templates and for connecting to Ansible Automation Platform and Dev Spaces. In this example, the Red Hat Developer Hub ConfigMap name is
app-config-rhdh.kind: ConfigMap apiVersion: v1 metadata: name: rhdh-app-config data: app-config-custom.yaml: | ... catalog: ... locations: # Remove the YAML entry below the 'locations' YAML key - type: url target: https://github.com/ansible/ansible-rhdh-templates/blob/main/all.yaml rules: - allow: [Template] ... # Remove the entire 'ansible' YAML key and all sub-entries ansible: devSpaces: baseUrl: '<https://YOUR_DEV_SPACES_URL>' creatorService: baseUrl: '127.0.0.1' port: '8000' rhaap: baseUrl: '<https://YOUR_AAP_URL>' token: <REDACTED> checkSSL: false -
Remove the
urlin thelocations:block to delete the templates from the RHDH instance. -
Remove the
ansible:block to delete the Ansible-specific configuration. -
Click Save.
8.3. Uninstalling the sidecar container
To remove the sidecar container for Ansible development tools from the developer-hub pod, you must modify the base ConfigMap for the Red Hat Developer Hub deployment.
-
In the OpenShift console, select the Topology view.
-
Click More actions ⋮ on the developer-hub instance and select Edit backstage to edit the base ConfigMap.
-
Select the YAML tab.
-
In the editing pane, remove the
containersblock for the sidecar container from thespec.deployment.patch.spec.template.specblock:... spec: deployment: patch: spec: template: spec: containers: - command: - adt - server image: ghcr.io/ansible/community-ansible-dev-tools:latest imagePullPolicy: always ports: - containerPort:8000 protocol: TCP terminationMessagePolicy: file -
Click Save.
9. Red Hat Developer Hub data telemetry capturing
Red Hat Developer Hub (RHDH) sends telemetry data to Red Hat using the backstage-plugin-analytics-provider-segment plug-in, which is enabled by default.
This includes telemetry data from the Ansible plug-ins.
Red Hat collects and analyzes the following data to improve your experience with Red Hat Developer Hub:
-
Events of page visits and clicks on links or buttons.
-
System-related information, for example, locale, timezone, user agent including browser and OS details.
-
Page-related information, for example, title, category, extension name, URL, path, referrer, and search parameters.
-
Anonymized IP addresses, recorded as 0.0.0.0.
-
Anonymized username hashes, which are unique identifiers used solely to identify the number of unique users of the RHDH application.
-
Feedback and sentiment provided in the Ansible plug-ins feedback form.
With Red Hat Developer Hub, you can disable or customize the telemetry data collection feature. For more information, refer to the Telemetry data collection section of the Administration guide for Red Hat Developer Hub.