Thank you for your interest in Red Hat Ansible Automation Platform. Ansible Automation Platform is a commercial offering that helps teams manage complex multi-tier deployments by adding control, knowledge, and delegation to Ansible-powered environments.
This guide describes how to develop Ansible automation content and how to use it to run automation jobs from Red Hat Ansible Automation Platform. This document has been updated to include information for the latest release of Ansible Automation Platform.
Providing feedback on Red Hat documentation
If you have a suggestion to improve this documentation, or find an error, you can contact technical support at https://access.redhat.com to open a request.
1. Ansible development tools
Ansible development tools (ansible-dev-tools) is a suite of tools provided with Ansible Automation Platform to help automation creators to
create, test, and deploy playbook projects, execution environments, and collections.
The Ansible VS Code extension by Red Hat integrates most of the Ansible development tools: you can use these tools from the VS Code user interface.
Use Ansible development tools during local development of playbooks, local testing, and in a CI pipeline (linting and testing).
This document describes how to use Ansible development tools to create a playbook project that contains playbooks and roles that you can reuse within the project. It also describes how to test the playbooks and deploy the project on your Ansible Automation Platform instance so that you can use the playbooks in automation jobs.
1.1. Ansible development tools components
You can operate some Ansible development tools from the VS Code UI when you have installed the Ansible extension, and the remainder from the command line. VS Code is a free open-source code editor available on Linux, Mac, and Windows.
- Ansible VS Code extension
-
This is not packaged with the Ansible Automation Platform RPM package, but it is an integral part of the automation creation workflow. From the VS Code UI, you can use the Ansible development tools for the following tasks:
-
Scaffold directories for a playbook project or a collection.
-
Write playbooks with the help of syntax highlighting and auto-completion.
-
Debug your playbooks with a linter.
-
Execute playbooks with Ansible Core using
ansible-playbook. -
Execute playbooks in an execution environment with
ansible-navigator.
From the VS Code extension, you can also connect to Red Hat Ansible Lightspeed with IBM watsonx Code Assistant.
-
- Command-line Ansible development tools
-
You can perform the following tasks with Ansible development tools from the command line, including the terminal in VS Code:
-
Create an execution environment.
-
Test your playbooks, roles, modules, plugins and collections.
-
2. Workflow for developing automation content
2.1. Workflow
2.1.1. Create
In the create stage, you create a new playbook project locally, using VS Code. The following is a typical workflow:
-
Install and run the Ansible extension in VS Code.
-
Scaffold a playbook project from VS Code.
-
Add playbook files to your project and edit them in VS Code.
2.1.2. Test
-
Debug your playbook with the help of
ansible-lint. -
Select or create an automation execution environment so that your local environment replicates the environment on Ansible Automation Platform.
-
Run your playbooks from VS Code, using
ansible-playbookor usingansible-navigatorwith an execution environment. -
Test your playbooks by running them on an execution environment that replicates your production environment.
2.1.3. Deploy
-
Push your playbooks project to a source control repository.
-
Set up credentials on Ansible Automation Platform to pull from your source control repository and create a project for your playbook repository.
-
If you have created an execution environment, push it to private automation hub.
-
Create a job template on Ansible Automation Platform that runs a playbook from your project, and specify the execution environment that you want to use.
3. Installing Ansible development tools
Red Hat provides two options for installing Ansible development tools.
-
Installation on a RHEL container running inside VS Code. You can install this option on MacOS, Windows, and Linux systems.
-
Installation on your local RHEL system using an RPM (Red Hat Package Manager) package.
3.1. Requirements
To install and use Ansible development tools, you must meet the following requirements. Extra requirements for Windows installations and containerized installations are indicated in the procedures.
-
Python 3.10 or later.
-
VS Code (Visual Studio Code) with the Ansible extension added. See Installing VS Code.
-
For containerized installations, the Micorsoft Dev Containers VS Code extension. See Installing and configuring the Dev Containers extension.
-
A containerization platform, for example Podman, Podman Desktop, Docker, or Docker Desktop.
NoteThe installation procedure for Ansible development tools on Windows covers the use of Podman Desktop only. See Installing Podman Desktop on a Windows machine.
-
You have a Red Hat account and you can log in to the Red Hat container registry at
registry.redhat.io. For information about logging in toregistry.redhat.io, see Authenticating with the Red Hat container registry.
3.1.1. Requirements for Ansible development tools on Windows
If you are installing Ansible development tools on a container in VS Code on Windows, there are extra requirements:
-
Windows Subsystem for Linux(WSL2)
-
Podman Desktop
Installing WSL
-
Install WSL2 without a distribution:
$ `wsl --install --no-distribution`
-
Use
cgroupsv2by disablingcgroupsv1for WSL2:Edit the
%USERPROFILE%/wsl.conffile and add the following lines to forcecgroupv2usage:[wsl2] kernelCommandLine = cgroup_no_v1="all"
Installing Podman Desktop on a Windows machine
-
Install Podman Desktop. Follow the instructions in Installing Podman Desktop and Podman on Windows in the Podman Desktop documentation.
You do not need to change the default settings in the set-up wizard.
-
Ensure the podman machine is using
cgroupsv2:$ podman info | findstr cgroup
-
Test Podman Desktop:
$ podman run hello
Configuring settings for Podman Desktop
-
Add a
%USERPROFILE%\bin\docker.batfile with the following content:@echo off podman %*
This avoids having to install Docker as required by the VS Code
Dev Containerextension. -
Add the
%USERPROFILE%\bindirectory to thePATH.-
Select Settings and search for "Edit environment variables for your account" to display all of the user environment variables.
-
Highlight "Path" in the top user variables box, click Edit and add the path.
-
Click Save to set the path for any new console that you open.
-
3.1.2. Authenticating with the Red Hat container registry
All container images available through the Red Hat container catalog are hosted on an image registry,
registry.redhat.io.
The registry requires authentication for access to images.
To use the registry.redhat.io registry, you must have a Red Hat login.
This is the same account that you use to log in to the Red Hat Customer Portal (access.redhat.com) and manage your Red Hat subscriptions.
|
Note
|
If you are planning to install the Ansible development tools on a container inside VS Code,
you must log in to If you are running Ansible development tools on a container inside VS Code and you want to pull execution environments
or the |
You can use the podman login or docker login commands with your credentials to access content on the registry.
- Podman
-
$ podman login registry.redhat.io
Username: my__redhat_username
Password: ***********
- Docker
-
$ docker login registry.redhat.io
Username: my__redhat_username
Password: ***********
For more information about Red Hat container registry authentication, see Red Hat Container Registry Authentication on the Red Hat customer portal.
3.1.3. Installing VS Code
-
To install VS Code, follow the instructions on the Download Visual Studio Code page in the Visual Studio Code documentation.
3.1.4. Installing the VS Code Ansible extension
The Ansible extension adds language support for Ansible to VS Code. It incorporates Ansible development tools to facilitate creating and running automation content.
For a full description of the Ansible extension, see the Visual Studio Code Marketplace.
See Learning path - Getting Started with the Ansible VS Code Extension for tutorials on working with the extension.
To install the Ansible VS Code extension:
-
Open VS Code.
-
Click the Extensions (
 ) icon in the Activity Bar, or click , to display the Extensions view.
 -
In the search field in the Extensions view, type
Ansible Red Hat. -
Select the Ansible extension and click Install.
When the language for a file is recognized as Ansible, the Ansible extension provides features such as auto-completion, hover, diagnostics, and goto. The language identified for a file is displayed in the Status bar at the bottom of the VS Code window.
The following files are assigned the Ansible language:
-
YAML files in a
/playbooksdirectory -
Files with the following double extension:
.ansible.ymlor.ansible.yaml -
Certain YAML names recognized by Ansible, for example
site.ymlorsite.yaml -
YAML files whose filename contains "playbook":
playbook.ymlorplaybook.yaml
If the extension does not identify the language for your playbook files as Ansible, follow the procedure in Associating the Ansible language to YAML files.
3.1.5. Configuring Ansible extension settings
The Ansible extension supports multiple configuration options.
You can configure the settings for the extension on a user level, on a workspace level, or for a particular directory. User-based settings are applied globally for any instance of VS Code that is opened. Workspace settings are stored within your workspace and only apply when the current workspace is opened.
It is useful to configure settings for your workspace for the following reasons:
-
If you define and maintain configurations specific to your playbook project, you can customize your Ansible development environment for individual projects without altering your preferred setup for other work. You can have different settings for a Python project, an Ansible project, and a C++ project, each optimized for the respective stack without the need to manually reconfigure settings each time you switch projects.
-
If you include workspace settings when setting up version control for a project you want to share with your team, everyone uses the same configuration for that project.
-
Open the Ansible extension settings:
-
Click the 'Extensions' icon in the activity bar.
-
Select the Ansible extension, and click the 'gear' icon and then Extension Settings to display the extension settings.
Alternatively, click to open the Settings page.
-
Enter
Ansiblein the search bar to display the settings for the extension.
-
-
Select the Workspace tab to configure your settings for the current VS Code workspace.
-
The Ansible extension settings are pre-populated. Modify the settings to suit your requirements:
-
Check the box to enable ansible-lint.
-
Check the
Ansible Execution Environment: Enabledbox to use an execution environment. -
Specify the execution environment image you want to use in the Ansible > Execution Environment: image field.
-
To use Red Hat Ansible Lightspeed, check the Ansible > Lightspeed: Enabled box, and enter the URL for Lightspeed.
-
The settings are documented on the Ansible VS Code Extension by Red Hat page in the VisualStudio marketplace documentation.
3.1.6. Associating the Ansible language to YAML files
The Ansible VS Code extension works only when the language associated with a file is set to Ansible. The extension provides features that help create Ansible playbooks, such as auto-completion, hover, and diagnostics.
The Ansible VS Code extension automatically associates the Ansible language with some files. The procedures below describe how to set the language for files that are not recognized as Ansible files.
The following procedure describes how to manually assign the Ansible language to a YAML file that is open in VS Code.
-
Open or create a YAML file in VS Code.
-
Hover the cursor over the language identified in the status bar at the bottom of the VS Code window to open the Select Language Mode list.
-
Select Ansible in the list.
The language shown in the status bar at the bottom of the VS Code window for the file is changed to Ansible.
settings.jsonAlternatively, you can add file association for the Ansible language in your settings.json file.
-
Open the
settings.jsonfile:-
Click to open the command palette.
-
Enter
Workspace settingsin the search box and select Open Workspace Settings (JSON).
-
-
Add the following code to
settings.json.{ ... "files.associations": { "*plays.yml": "ansible", "*init.yml": "yaml", } }
3.1.7. Installing and configuring the Dev Containers extension
If you are installing the containerized version of Ansible development tools, you must install the Microsoft Dev Containers extension in VS Code.
-
Open VS Code.
-
Click the Extensions (
) icon in the Activity Bar, or click , to display the Extensions view. -
In the search field in the Extensions view, type
Dev Containers. -
Select the Dev Containers extension from Microsoft and click Install.
If you are using Podman or Podman Desktop as your containerization platform, you must modify the default settings in the Dev Containers extension.
-
Replace docker with podman in the
Dev Containersextension settings:-
In VS Code, open the settings editor.
-
Search for
@ext:ms-vscode-remote.remote-containers.Alternatively, click the Extensions icon in the activity bar and click the gear icon for the
Dev Containersextension.
-
-
Set
Dev > Containers:Docker Pathtopodman. -
Set
Dev > Containers:Docker Compose Pathtopodman-compose.
3.2. Installing Ansible development tools on a container inside VS Code
The Dev Containers VS Code extension requires a .devcontainer file to store settings for your dev containers.
You must create a config file for your dev container and reopen your directory in a container in VS Code.
-
You have installed a containerization platform, for example Podman, Podman Desktop, Docker, or Docker Desktop.
-
You have a Red Hat login and you have logged in to the Red Hat registry at
registry.redhat.io. For information about logging in toregistry.redhat.io, see Authenticating with the Red Hat container registry. -
You have installed VS Code.
-
You have installed the Ansible extension in VS Code.
-
You have installed the Microsoft Dev Containers extension in VS Code.
-
If you are installing Ansible development tools on Windows, launch VS Code and connect to the WSL machine:
-
Click the
Remote( ) icon.
 -
In the dropdown menu that appears, select the option to connect to the WSL machine.
-
-
In VS Code, open the directory where you want to store the configuration files for your development container.
-
Create a subdirectory called
.devcontainer. -
In the
.devcontainerdirectory, create a file calleddevcontainer.json.You must use different settings depending on whether you are using Podman or Docker.
-
If you are using Podman or Podman desktop, add the following text to
devcontainer.json:{ "name": "ansible-dev-container-podman", "image": "registry.redhat.io/ansible-automation-platform-25/ansible-dev-tools-rhel8:latest", "containerUser": "root", "runArgs": [ "--cap-add=CAP_MKNOD", "--cap-add=NET_ADMIN", "--cap-add=SYS_ADMIN", "--cap-add=SYS_RESOURCE", "--device", "/dev/fuse", "--security-opt", "seccomp=unconfined", "--security-opt", "label=disable", "--security-opt", "apparmor=unconfined", "--security-opt", "unmask=/sys/fs/cgroup", "--userns=host", "--hostname=ansible-dev-container" ], "customizations": { "vscode": { "extensions": ["redhat.ansible"] } } } -
If you are using Docker or Docker desktop, add the following text to
devcontainer.json:{ "name": "ansible-dev-container-docker", "image": "registry.redhat.io/ansible-automation-platform-25/ansible-dev-tools-rhel8:latest", "containerUser": "root", "runArgs": [ "--privileged", "--device", "/dev/fuse", "--hostname=ansible-dev-container" ], "updateRemoteUserUID": true, "customizations": { "vscode": { "extensions": ["redhat.ansible"] } } }
-
-
Reopen the directory in a container.
-
If VS Code detects that your directory contains the
devcontainer.jsonfile, the following notification appears: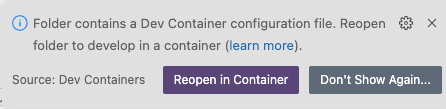
Click Reopen in Container.
-
If the notification does not appear, click the
Remote() icon. In the dropdown menu that appears, select Reopen in Container.
-
The Remote () status in the VS Code Status bar displays opening Remote and a notification indicates the progress in opening the container.
When the directory reopens in a container, the Remote () status displays Dev Container: ansible-dev-container.
|
Note
|
The base image for the container is a Universal Base Image Minimal (UBI Minimal) image that uses For information about using |
3.3. Installing Ansible development tools from a package on RHEL
Ansible development tools is bundled in the Ansible Automation Platform RPM (Red Hat Package Manager) package. Refer to the RPM installation documentation for information on installing Ansible Automation Platform.
-
You have installed RHEL.
-
You have registered your system with Red Hat Subscription Manager.
-
You have installed a containerization platform, for example Podman or Docker.
-
Run the following command to check whether Simple Content Access (SCA) is enabled:
$ su subscription-manager statusIf Simple Content Access is enabled, the output contains the following message:
Content Access Mode is set to Simple Content Access.
-
If Simple Content Access is not enabled, attach the Red Hat Ansible Automation Platform SKU:
$ subscription-manager attach --pool=<sku-pool-id>
-
-
Install Ansible development tools with the following command:
$ sudo dnf install --enablerepo=ansible-automation-platform-2.4-for-rhel-8-x86_64-rpms ansible-dev-tools$ sudo dnf install --enablerepo=ansible-automation-platform-2.4-for-rhel-9-x86_64-rpms ansible-dev-tools
Verify that the Ansible development tools components have been installed:
$ rpm -aq | grep ansibleThe output displays the Ansible packages that are installed:
ansible-sign-0.1.1-2.el9ap.noarch
ansible-creator-24.4.1-1.el9ap.noarch
python3.11-ansible-runner-2.4.0-0.1.20240412.git764790f.el9ap.noarch
ansible-runner-2.4.0-0.1.20240412.git764790f.el9ap.noarch
ansible-builder-3.1.0-0.2.20240413.git167ed5c.el9ap.noarch
ansible-dev-environment-24.1.0-2.el9ap.noarch
ansible-core-2.16.6-0.1.20240413.gite636132.el9ap.noarch
python3.11-ansible-compat-4.1.11-2.el9ap.noarch
python3.11-pytest-ansible-24.1.2-1.el9ap.noarch
ansible-lint-6.14.3-4.el9ap.noarch
ansible-navigator-3.4.1-2.el9ap.noarch
python3.11-tox-ansible-24.2.0-1.el9ap.noarch
ansible-dev-tools-2.5-2.el9ap.noarch
On successful installation, you can view the help documentation for ansible-creator:
$ ansible-creator --help

usage: ansible-creator [-h] [--version] command ...

The fastest way to generate all your ansible content.

Positional arguments:
 command
  add           Add resources to an existing Ansible project.
  init          Initialize a new Ansible project.

Options:
 --version      Print ansible-creator version and exit.
 -h     --help  Show this help message and exit
4. Creating a playbook project
4.1. Scaffolding a playbook project
The following steps describe the process for scaffolding a new playbook project with the Ansible VS Code extension.
-
Prerequisites
-
You have installed Ansible development tools.
-
You have installed and opened the Ansible VS Code extension.
-
You have identified a directory where you want to save the project.
-
-
Open VS Code.
-
Click the Ansible icon in the VS Code activity bar to open the Ansible extension.
-
Select Get started in the Ansible content creator section.
The Ansible content creator tab opens.
-
In the Create section, click Ansible playbook project.
The Create Ansible project tab opens.
-
In the form in the Create Ansible project tab, enter the following:
-
Destination directory: Enter the path to the directory where you want to scaffold your new playbook project.
NoteIf you enter an existing directory name, the scaffolding process overwrites the contents of that directory. The scaffold process only allows you to use an existing directory if you enable the
Forceoption.-
If you are using the containerized version of Ansible Dev tools, the destination directory path is relative to the container, not a path in your local system. To discover the current directory name in the container, run the
pwdcommand in a terminal in VS Code. If the current directory in the container isworkspaces, enterworkspaces/<destination_directory_name>. -
If you are using a locally installed version of Ansible Dev tools, enter the full path to the directory, for example
/user/<username>/projects/<destination_directory_name>.
-
-
SCM organization and SCM project: Enter a name for the directory and subdirectory where you can store roles that you create for your playbooks.
-
-
Enter a name for the directory where you want to scaffold your new playbook project.
After the project directory has been created, the following message appears in the Logs pane of the Create Ansible Project tab.
In this example, the destination directory name is destination_directory_name.
------------------ ansible-creator logs ------------------
    Note: ansible project created at /Users/username/test_project
The following directories and files are created in your project directory:
$ tree -a -L 5 .
├── .devcontainer
│   ├── devcontainer.json
│   ├── docker
│   │   └── devcontainer.json
│   └── podman
│       └── devcontainer.json
├── .gitignore
├── README.md
├── ansible-navigator.yml
├── ansible.cfg
├── collections
│   ├── ansible_collections
│   │   └── scm_organization_name
│   │       └── scm_project_name
│   └── requirements.yml
├── devfile.yaml
├── inventory
│   ├── group_vars
│   │   ├── all.yml
│   │   └── web_servers.yml
│   ├── host_vars
│   │   ├── server1.yml
│   │   ├── server2.yml
│   │   ├── server3.yml
│   │   ├── switch1.yml
│   │   └── switch2.yml
│   └── hosts.yml
├── linux_playbook.yml
├── network_playbook.yml
└── site.yml
5. Writing and running a playbook with Ansible development tools
5.1. Setting up the Ansible configuration file for your playbook project
When you scaffolded your playbook project, an Ansible configuration file, ansible.cfg,
was added to the root directory of your project.
If you have configured a default Ansible configuration file in /etc/ansible/ansible.cfg,
copy any settings that you want to reuse in your project from your default Ansible configuration file
to the ansible.cfg file in your project’s root directory.
To learn more about the Ansible configuration file, see Ansible Configuration Settings in the Ansible documentation.
5.2. Writing your first playbook
The instructions below describe how Ansible development tools help you to create and run your first playbook in VS Code.
-
You have installed and opened the Ansible VS Code extension.
-
You have opened a terminal in VS Code.
-
You have installed
ansible-devtools.
-
Create a new .yml file in VS Code for your playbook, for example
example_playbook.yml. Put it in the same directory level as the examplesite.ymlfile. -
Add the following example code into the playbook file and save the file. The playbook consists of a single play that executes a
pingto your local machine.--- - name: My first play hosts: localhost tasks: - name: Ping my hosts ansible.builtin.ping:Ansible-lintruns in the background and displays errors in the Problems tab of the terminal. There are no errors in this playbook:
-
Save your playbook file.
5.3. Inspecting your playbook
The Ansible VS Code extension provides syntax highlighting and assists you with indentation in .yml files.
The following rules apply for playbook files:
-
Every playbook file must finish with a blank line.
-
Trailing spaces at the end of lines are not allowed.
-
Every playbook and every play require an identifier (name).
5.3.1. Inline help
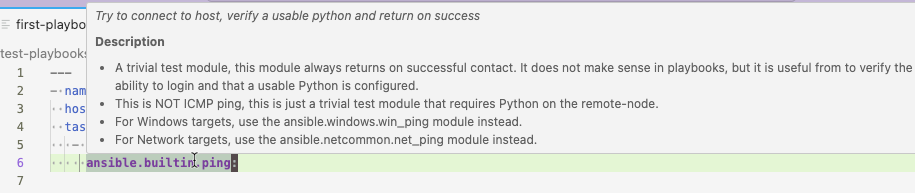
The Ansible extension also provides inline help when you are editing your playbook file.
-
If you hover your mouse over a keyword or a module name, the Ansible extension provides documentation:
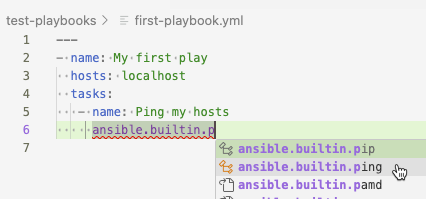
-
If you begin to type the name of a module, for example
ansible.builtin.ping, the extension provides a list of suggestions.Select one of the suggestions to autocomplete the line.
5.4. Running your playbook
The Ansible VS Code extension provides two options to run your playbook:
-
ansible-playbookruns the playbook on your local machine using Ansible Core. -
ansible-navigatorruns the playbook in an execution environment in the same manner that Ansible Automation Platform runs an automation job. You specify the base image for the execution environment in the Ansible extension settings.
5.4.1. Running your playbook with ansible-playbook
-
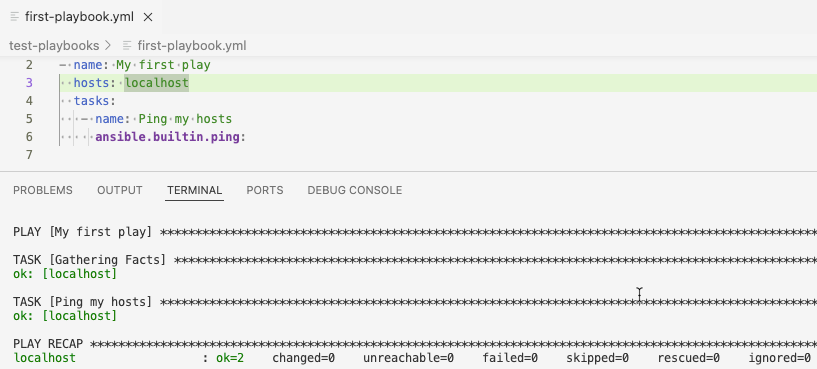
To run a playbook, right-click the playbook name in the Explorer pane, then select .
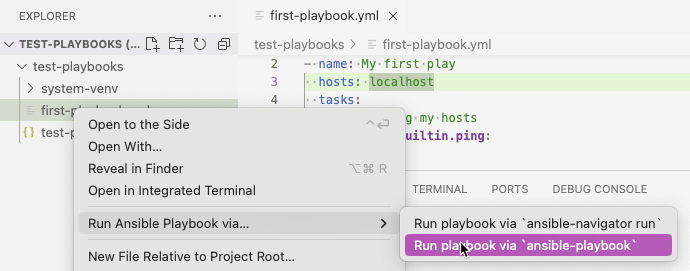
The output is displayed in the Terminal tab of the VS Code terminal.
The ok=2 and failed=0 messages indicate that the playbook ran successfully.
5.4.2. Running your playbook with ansible-navigator
-
In the Ansible extension settings, enable the use of an execution environment in Ansible Execution Environment > Enabled.
-
Enter the path or URL for the execution environment image in Ansible > Execution Environment: Image.
-
To run a playbook, right-click the playbook name in the Explorer pane, then select .
The output is displayed in the Terminal tab of the VS Code terminal. The Successful status indicates that the playbook ran successfully.

-
Enter the number next to a play to step into the play results. The example playbook only contains one play. Enter
0to view the status of the tasks executed in the play.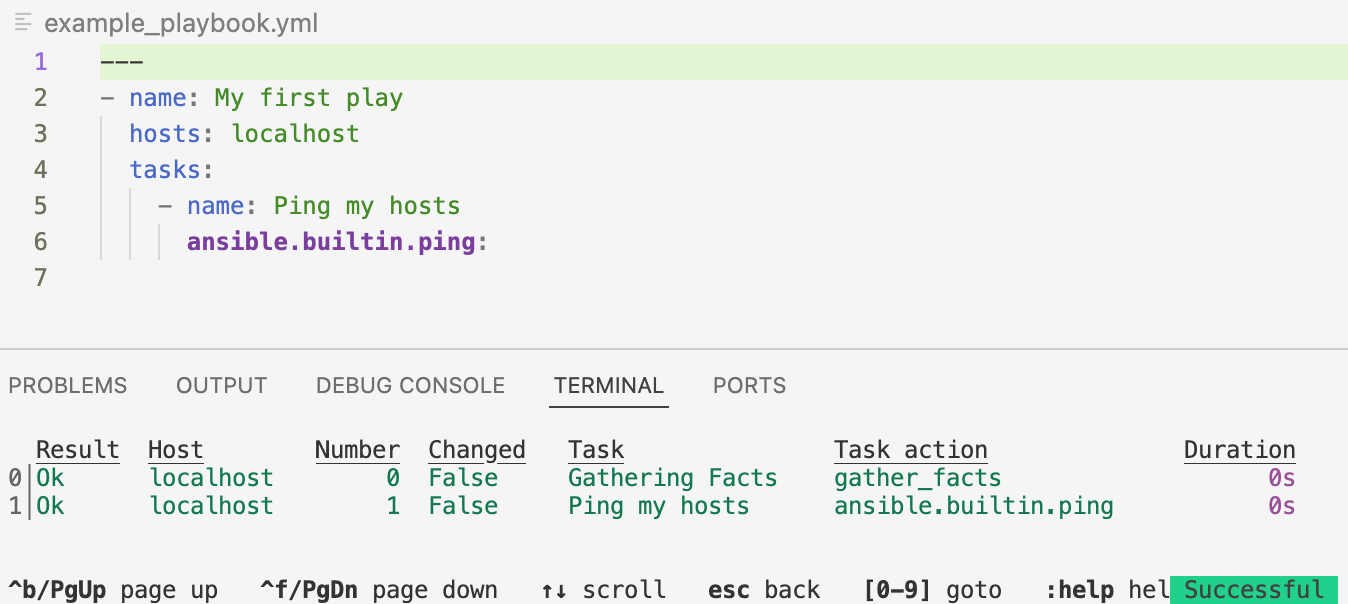
Type the number next to a task to review the task results.
For more information on running playbooks with automation content navigator, see Executing a playbook from automation content navigator in the Using content navigator Guide.
5.4.3. Working with execution environments
You can view the automation execution environments provided by Red Hat in the Red Hat Ecosystem Catalog.
Click on an execution environment for information on how to download it.
-
Log in to
registry.redhat.ioif you have not already done so.NoteIf you are running Ansible development tools on a container inside VS Code and you want to pull execution environments or the
devcontainerto use as an execution environment, you must log in toregistry.redhat.iofrom a terminal prompt within thedevcontainerinside VS Code. -
Using the information in the Red Hat Ecosystem Catalog, download the execution environment you need.
For example, to download the minimal RHEL 8 base image, run the following command:
$ podman pull registry.redhat.io/ansible-automation-platform-25/ee-minimal-rhel9
You can build and create custom execution environments with ansible-builder.
For more information about working with execution environments locally, see
Creating and using execution environments.
After customizing your execution environment, you can push your new image to the container registry in automation hub. See Publishing an automation execution environment in the Creating and using execution environments documentation.
5.5. Debugging with ansible-lint in VS Code
When the Ansible extension is running in VS Code, ansible-lint runs in the background. Diagnostics information for files whose language is identified as Ansible is displayed in the Problems tab of the terminal.
Ansible Lint loads configuration from the .ansible-lint.yml configuration file in the .config directory of your project workspace.
For example, you can specify strict linting rules for production, or less strict rules in the development phase.
For information about customizing the configuration file, see Customizing Ansible Lint.
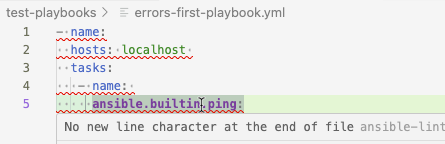
The following playbook contains multiple errors:
- name:
  hosts: localhost
  tasks:
   - name:
     ansible.builtin.ping:
The errors are indicated with a wavy underline in VS Code. Hover your mouse over an error to view the details:
The errors are listed in the Problems tab of the VS Code terminal. Playbook files that contain errors are indicated with a number in the Explorer pane:
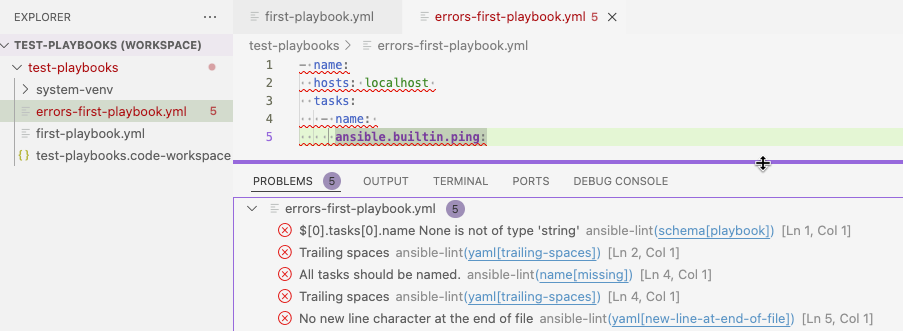
$[0].tasks[0].name None is not of type 'string' indicates that the playbook does not have a label.
5.6. Testing your playbooks
To test your playbooks in your project, run them in a non-production environment such as a lab setup or a virtual machine.
Automation content navigator (ansible-navigator) is a text-based user interface (TUI) for developing and troubleshooting Ansible content with execution environments.
Running a playbook using ansible-navigator generates verbose output that you can inspect to check whether the playbook is running the way you expected.
You can specify the execution environment that you want to run your playbooks on, so that your tests replicate the production setup on Ansible Automation Platform:
-
To run a playbook on an execution environment, run the following command from the terminal in VS Code:
$ ansible-navigator run <playbook_name.yml> -eei <execution_environment_name>
For example, to execute a playbook called
site.ymlon the Ansible Automation Platform RHEL 9 minimum execution environment, run the following command from the terminal in VS Code.ansible-navigator run site.yml --eei ee-minimal-rhel8
The output is displayed in the terminal. You can inspect the results and step into each play and task that was executed.
For more information about running playbooks, refer to Running Ansible playbooks with automation content navigator in the Using content navigator guide.
6. Publishing and running your playbooks in Ansible Automation Platform
The following procedures describe how to deploy your new playbooks in your instance of Ansible Automation Platform so that you can use them to run automation jobs.
6.1. Saving your project in SCM
Save your playbook project as a repository in your source control management system, for example GitHub.
-
Initialize your project directory as a git repository.
-
Push your project up to a source control system such as GitHub.
6.2. Running your playbook in Ansible Automation Platform
To run your playbook in Ansible Automation Platform, you must create a project in automation controller for the repository where you stored your playbook project. You can then create a job template for each playbook from the project.
-
In a browser, log in to automation controller.
-
Configure a Source Control credential type for your source control system if necessary. See the Creating new credentials section of Using automation execution for more details. https://docs.redhat.com/en/documentation/red_hat_ansible_automation_platform/2.5/html/using_automation_execution/controller-credentials#controller-create-credential
-
In automation controller, create a project for the GitHub repository where you stored your playbook project. Refer to the Projects chapter of Using automation execution.
-
Create a job template that uses a playbook from the project that you created. Refer to the Job Templates chapter of Using automation execution.
-
Run your playbook from automation controller by launching the job template. Refer to the Launching a job template section of Using automation execution.
7. Developing collections
Collections are a distribution format for Ansible content that can include playbooks, roles, modules, and plugins. Red Hat provides Ansible Content Collections on Ansible automation hub that contain both Red Hat Ansible Certified Content and Ansible validated content.
If you have installed private automation hub, you can create collections for your organization and push them to private automation hub so that you can use them in job templates in Ansible Automation Platform. You can use collections to package and distribute plug-ins. These plug-ins are written in Python.
You can also create collections to package and distribute Ansible roles, which are expressed in YAML. You can also include playbooks and custom plug-ins that are required for these roles in the collection. Typically, collections of roles are distributed for use within your organization.
8. Creating a collection for distributing roles
An Ansible role is a self-contained unit of Ansible automation content that groups related tasks and associated variables, files, handlers, and other assets in a defined directory structure.
You can run Ansible roles in one or more plays, and reuse them across playbooks. Invoking roles instead of tasks simplifies playbooks. You can migrate existing standalone roles into collections, and push them to private automation hub to share them with other users in your organization. Distributing roles in this way is a typical way to use collections.
With Ansible collections, you can store and distribute multiple roles in a single unit of reusable automation. Inside a collection, you can share custom plug-ins across all roles in the collection instead of duplicating them in each role.
You must move roles into collections if you want to use them in Ansible Automation Platform.
You can add existing standalone roles to a collection, or add new roles to it. Push the collection to source control and configure credentials for the repository in Ansible Automation Platform.
8.1. Planning your collection
Organize smaller bundles of curated automation into separate collections for specific functions, rather than creating one big general collection for all of your roles.
For example, you could store roles that manage the networking for an internal system called myapp in a company_namespace.myapp_network collection,
and store roles that manage and deploy networking in AWS in a collection called company_namespace.aws_net.
8.2. Prerequisites
-
You have installed VS Code and the Ansible extension.
-
You have installed the Microsoft Dev Containers extension in VS Code.
-
You have installed Ansible development tools.
-
You have installed a containerization platform, for example Podman, Podman Desktop, Docker, or Docker Desktop.
-
You have a Red Hat account and you can log in to the Red Hat container registry at
registry.redhat.io. For information about logging in toregistry.redhat.io, see Authenticating with the Red Hat container registry.
8.3. Scaffolding a collection for your roles
You can scaffold a collection for your roles from the Ansible extension in VS Code.
-
Open VS Code.
-
Navigate to the directory where you want to create your roles collection.
-
Click the Ansible icon in the VS Code activity bar to open the Ansible extension.
-
Select Get started in the Ansible content creator section.
The Ansible content creator tab opens.
-
In the Create section, click Ansible collection project.
The Create new Ansible project tab opens.
-
In the form in the Create Ansible project tab, enter the following:
-
Namespace: Enter a name for your namespace, for example
company_namespace. -
Collection: Enter a name for your collection, for example,
myapp_network. -
Init path: Enter the path to the directory where you want to scaffold your new collection.
If you enter an existing directory name, the scaffolding process overwrites the contents of that directory. The scaffold process only allows you to use an existing directory if you enable the Force option.
-
If you are using the containerized version of Ansible development tools, the destination directory path is relative to the container, not a path in your local system. To discover the current directory name in the container, run the pwd command in a terminal in VS Code. If the current directory in the container is
workspaces, enterworkspaces/<current_project>/collections. -
If you are using a locally installed version of Ansible Dev tools, enter the full path to the directory, for example
/user/<username>/path/to/<collection_directory>.
-
-
-
Click Create.
The following message appears in the Logs pane of the Create Ansible collection tab.
--------------------- ansible-creator logs ---------------------

    Note: collection company_namespace.myapp_network created at /path/to/collections/directory
The following directories and files are created in your collections/ directory:
├── .devcontainer
├── .github
├── .gitignore
├── .isort.cfg
├── .pre-commit-config.yaml
├── .prettierignore
├── .vscode
├── CHANGELOG.rst
├── CODE_OF_CONDUCT.md
├── CONTRIBUTING
├── LICENSE
├── MAINTAINERS
├── README.md
├── changelogs
├── devfile.yaml
├── docs
├── extensions
├── galaxy.yml
├── meta
├── plugins
├── pyproject.toml
├── requirements.txt
├── roles
├── test-requirements.txt
├── tests
└── tox-ansible.ini
8.4. Migrating existing roles to your collection
The directory for a standalone role has the following structure. Your role might not contain all of these directories.
my_role
├── README.md
├── defaults
│   └── main.yml
├── files
├── handlers
│   └── main.yml
├── meta
│   └── main.yml
├── tasks
│   └── main.yml
├── templates
├── tests
│   ├── inventory
│   └── test.yml
└── vars
    └── main.yml
An Ansible role has a defined directory structure with seven main standard directories.
Each role must must include at least one of these directories.
You can omit any directories the role does not use.
Each directory contains a main.yml file.
-
If necessary, rename the directory that contains your role to reflect its content, for example,
acl_configortacacs.Roles in collections cannot have hyphens in their names. Use the underscore character (
_) instead. -
Copy the roles directories from your standalone role into the
roles/directory in your collection.For example, in a collection called
myapp_network, add your roles to themyapp_network/roles/directory. -
Copy any plug-ins from your standalone roles into the
plugins directory/for your new collection. The collection directory structure resembles the following.company_namespace └── myapp_network ├── ... ├── galaxy.yml ├── docs ├── extensions ├── meta ├── plugins ├── roles │ ├── acl_config │ │ ├── README.md │ │ ├── defaults │ │ ├── files │ │ ├── handlers │ │ ├── meta │ │ ├── tasks │ │ ├── templates │ │ ├── tests │ │ └── vars │ └── tacacs │ ├── README.md │ ├── default │ ├── files │ ├── handlers │ ├── meta │ ├── tasks │ ├── templates │ ├── tests │ └── vars │ ├── run ├── ... ├── tests └── varsThe
runrole is a default role directory that is created when you scaffold the collection. -
Update your playbooks to use the fully qualified collection name (FQDN) for your new roles in your collection.
Not every standalone role will seamlessly integrate into your collection without modification of the code.
For example, if a third-party standalone role from Galaxy that contains a plug-in uses the module_utils/ directory,
then the plug-in itself has import statements.
8.5. Creating a new role in your collection
-
To create a new role, copy the default
runrole directory that was scaffolded when you created the collection. -
Define the tasks that you want your role to perform in the
tasks/main.ymlfile. If you are creating a role to reuse tasks in an existing playbook, copy the content in the tasks block of your playbook YAML file. Remove the whitespace to the left of the tasks. Useansible-lintin VS Code to check your YAML code. -
If your role depends on another role, add the dependency in the
meta/main.ymlfile.
8.6. Adding documentation for your roles collection
It is important to provide documentation for your roles so that other users understand what your roles do and how to use them.
8.6.1. Documenting your roles
When you scaffolded your collection directory, a README.md file was added in the role directory.
Add your documentation for your role in this file.
Provide the following information in the README.md files for every role in your collection:
-
Role description: A brief summary of what the role does
-
Requirements: List the collections, libraries, and required installations
-
Dependencies
-
Role variables: Provide the following information about the variables your role uses.
-
Description
-
Defaults
-
Example values
-
Required variables
-
-
Example playbook: Show an example of a playbook that uses your role. Use comments in the playbook to help users understand where to set variables.
The README.md file in controller_configuration.ad_hoc_command_cancel is an example of a role with standard documentation:
8.6.2. Documenting your collection
In the README.md file for your collection, provide the following information:
-
Collection description: Describe what the collection does.
-
Requirements: List required collections.
-
List the roles as a component of the collection.
-
Using the collection: Describe how to run the components of the collection.
-
Add a troubleshooting section.
-
Versioning: Describe the release cycle of your collection.
8.7. Publishing your collection in private automation hub
-
Prerequisite
-
Package your collection into a tarball. Format your collection file name as follows:
-
<my_namespace-my_collection-x.y.z.tar.gz>
For example, company_namespace-myapp_network-1.0.0.tar.gz
-
Create a namespace for your collection in private automation hub. See Creating a namespace in the Managing automation content guide.
-
Optional: Add information to your namespace. See Adding additional information and resources to a namespace in the Managing automation content guide.
-
Upload your roles collections tarballs to your namespace. See Uploading collections to your namespaces in the Managing automation content guide.
-
Approve your collection for internal publication. See Uploading collections to your namespaces in the Managing automation content guide.
8.7.1. Using your collection in projects in Red Hat Ansible Automation Platform
To use your collection in automation controller, you must add your collection to an execution environment and push it to private automation hub.
The following procedure describes the workflow to add a collection to an execution environment. Refer to Customizing an existing automation executions environment image in the Creating and using execution environments guide for the commands to execute these steps.
-
You can pull an execution environment base image from automation hub, or you can add your collection to your own custom execution environment.
-
Add the collections that you want to include in the execution environment.
-
Build the new execution environment.
-
Verify that the collections are in the execution environment.
-
Tag the image and push it to private automation hub.
-
Pull your new image into your automation controller instance.
-
The playbooks that use the roles in your collection must use the fully qualified domain name (FQDN) for the roles.
9. Working with ansible-lint
9.1. About Ansible Lint
Ansible Lint (ansible-lint) is a linter specifically designed for Ansible playbooks and roles.
Ansible Lint flags syntax and programming errors, bugs, stylistic errors, and suspicious constructs. It also ensures that your Ansible files follow standard practices so that content created by different people has a similar look and feel.
Ansible Lint checks your roles and playbooks against a set of rules.
Profiles are predefined groups of these rules that configure how ansible-lint runs in different scenarios.
For example, the basic profile uses fewer rules and is therefore less strict than the production profile.
You can set the profile you want to use, as well as other preferences for Ansible Lint, in the .ansible-lint.yml configuration file.
You can view reports about your playbook and roles files in the terminal in VS Code, or you can run ansible-lint commands from the command line.
-
For information about rules in Ansible Lint, see Rules.
-
For information about profiles in Ansible Lint, see Applying profiles.
9.2. Debugging with ansible-lint in VS Code
When the Ansible extension is running in VS Code, ansible-lint runs in the background. Diagnostics information for files whose language is identified as Ansible is displayed in the Problems tab of the terminal.
Ansible Lint loads configuration from the .ansible-lint.yml configuration file in the .config directory of your project workspace.
For example, you can specify strict linting rules for production, or less strict rules in the development phase.
For information about customizing the configuration file, see Customizing Ansible Lint.
The following playbook contains multiple errors:
- name:
  hosts: localhost
  tasks:
   - name:
     ansible.builtin.ping:
The errors are indicated with a wavy underline in VS Code. Hover your mouse over an error to view the details:
The errors are listed in the Problems tab of the VS Code terminal. Playbook files that contain errors are indicated with a number in the Explorer pane:
$[0].tasks[0].name None is not of type 'string' indicates that the playbook does not have a label.
9.3. Rules
A rule in Ansible Lint defines a best practice or an anti-pattern for Ansible playbooks and roles.
Each rule has a unique name.
You can specify which rules to enable or disable in the .ansible-lint.yml configuration file.
9.3.1. Listing ansible-lint rules
To list the Ansible Lint rules, run the following command:
$ ansible-lint -L
Specify the verbosity with the -f switch.
$ ansible-lint -L -f brief # (1)
$ ansible-lint -L -f full  # (2)
-
Displays a concise description of the rule.
-
Displays a more verbose description of the rule.
9.4. Customizing Ansible Lint
You can customize how Ansible Lint runs against automation content to suit your needs. You can ignore certain rules, enable opt-in rules, and control other settings.
Ansible Lint loads configuration from the .ansible-lint.yml configuration file, or from a file that you specify in the command line.
This file is not scaffolded when you create a playbook or collection project.
You must create the file in the .config directory of your VS Code workspace.
Any configuration option that is passed from the command line will override the one specified inside the configuration file.
The example .ansible-lint.yml file below selects the production profile.
The settings are explained in the comments.
---
# .ansible-lint

profile: production     # min, basic, moderate,safety, shared, production, null

# Allows dumping of results in SARIF format
# sarif_file: result.sarif

# exclude_paths included in this file are parsed relative to this file's location
# and not relative to the CWD of execution. CLI arguments passed to the --exclude
# option are parsed relative to the CWD of execution.
exclude_paths:
  - .cache/ # implicit unless exclude_paths is defined in config
  - test/fixtures/formatting-before/
  - test/fixtures/formatting-prettier/
# parseable: true
# quiet: true
# strict: true
# verbosity: 1

# Mock modules or roles in order to pass ansible-playbook --syntax-check
mock_modules:
  - zuul_return
  # note the foo.bar is invalid as being neither a module or a collection
  - fake_namespace.fake_collection.fake_module
  - fake_namespace.fake_collection.fake_module.fake_submodule
mock_roles:
  - mocked_role
  - author.role_name # old standalone galaxy role
  - fake_namespace.fake_collection.fake_role # role within a collection

# Enable checking of loop variable prefixes in roles
loop_var_prefix: "^(__|{role}_)"

# Enforce variable names to follow pattern below, in addition to Ansible own
# requirements, like avoiding python identifiers. To disable add `var-naming`
# to skip_list.
var_naming_pattern: "^[a-z_][a-z0-9_]*$"

use_default_rules: true
# Load custom rules from this specific folder
# rulesdir:
#   - ./rule/directory/

# Ansible-lint is able to recognize and load skip rules stored inside
# `.ansible-lint-ignore` (or `.config/ansible-lint-ignore.txt`) files.
# To skip a rule just enter filename and tag, like "playbook.yml package-latest"
# on a new line.
# Optionally you can add comments after the tag, prefixed by "#".
# When putting ignores inside the ignore file, they are marked as ignored, but
# still visible, making it easier to address later.

# Ansible-lint does not automatically load rules that have the 'opt-in' tag.
# You must enable opt-in rules by listing each rule 'id' below.
enable_list:
  - args
  - empty-string-compare # opt-in
  - no-log-password # opt-in
  - no-same-owner # opt-in
  - name[prefix] # opt-in
  - galaxy-version-incorrect # opt-in
  # add yaml here if you want to avoid ignoring yaml checks when yamllint
  # library is missing. Normally its absence just skips using that rule.
  - yaml
# Report only a subset of tags and fully ignore any others
# tags:
#   - jinja[spacing]

# Ansible-lint does not fail on warnings from the rules or tags listed below
warn_list:
  - skip_this_tag
  - experimental # experimental is included in the implicit list
  # - role-name
  # - yaml[document-start]  # you can also use sub-rule matches

# Some rules can transform files to fix (or make it easier to fix) identified
# errors. `ansible-lint --fix` will reformat YAML files and run these transforms.
# By default it will run all transforms (effectively `write_list: ["all"]`).
# You can disable running transforms by setting `write_list: ["none"]`.
# Or only enable a subset of rule transforms by listing rules/tags here.
# write_list:
#   - all

# Offline mode disables installation of requirements.yml and schema refreshing
offline: true

# Define required Ansible's variables to satisfy syntax check
extra_vars:
  foo: bar
  multiline_string_variable: |
    line1
    line2
  complex_variable: ":{;\t$()"

# Uncomment to enforce action validation with tasks, usually is not
# needed as Ansible syntax check also covers it.
# skip_action_validation: false

# List of additional kind:pattern to be added at the top of the default
# match list, first match determines the file kind.
kinds:
  # - playbook: "**/examples/*.{yml,yaml}"
  # - galaxy: "**/folder/galaxy.yml"
  # - tasks: "**/tasks/*.yml"
  # - vars: "**/vars/*.yml"
  # - meta: "**/meta/main.yml"
  - yaml: "**/*.yaml-too"

# List of additional collections to allow in only-builtins rule.
# only_builtins_allow_collections:
#   - example_ns.example_collection

# List of additions modules to allow in only-builtins rule.
# only_builtins_allow_modules:
#   - example_module

# Allow setting custom prefix for name[prefix] rule
task_name_prefix: "{stem} | "
# Complexity related settings

# Limit the depth of the nested blocks:
# max_block_depth: 20
The following example .ansible-lint.yml file excludes the comments.
It selects the production profile and enables fixing of files.
---
profile: 'production'

loop_var_prefix: '^(__|{role}_)'
var_naming_pattern: '^[a-z_][a-z0-9_]*$'
use_default_rules: true
offline: true
skip_action_validation: false

kinds:
  - tasks: 'tasks/*.{yml,yaml}'
  - vars: 'vars/*.{yml,yaml}'
  - vars: 'defaults/*.{yml,yaml}'
  - meta: 'meta/main.{yml,yaml}'
  - yaml: '.ansible-lint'
  - yaml: '.github/workflows/*.{yml,yaml}'
  - yaml: '.pre-commit-config.yaml'
  - yaml: '.yamllint'
  - yaml: 'collections/requirements.yml'

task_name_prefix: '{stem} | '

exclude_paths:
  - '.git/'
  - 'files/'

max_block_depth: 20
skip_list: []
warn_list:
  - 'experimental'
write_list:
  - 'all'
To specify a custom configuration file instead of the default file when running ansible-lint, use the -c <filename> flag followed by the filename:
ansible-lint -c <path/to/custom_lint_configuration_file.yml>
9.5. Applying profiles
A profile specifies a predefined collection of rules to be applied when running ansible-lint.
Profiles allow you to group related rules together and switch between different sets of checks easily,
so that you can enforce different levels of strictness when linting.
This is useful when you need to apply different linting standards for different contexts, for example development and production environments, so that you can progressively improve the quality of Ansible files.
The following command displays the available profiles:
ansible-lint --list-profiles
The predefined profiles below are listed from least strict to most strict.
min-
Ensures that Ansible can load content. Rules in this profile are mandatory because they prevent fatal errors.
basic-
Prevents common coding issues and enforces standard styles and formatting.
moderate-
Ensures that content adheres to best practices for making content easier to read and maintain.
safety-
Avoids module calls that can have non-determinant outcomes or security concerns.
shared-
Ensures that content follows best practices for packaging and publishing. This profile is intended for content creators who want to make Ansible playbooks, roles, or collections available from
galaxy.ansible.com. production-
Ensures that content meets requirements for inclusion in Ansible Automation Platform as validated or certified content.
The profiles are incremental: the stricter profiles include the rules from the less strict profiles.
For example, the moderate profile includes the rules from the basic and min profiles.
To specify a profile for linting your content, use the --profile parameter:
ansible-lint --profile=<profile_name>
During early development cycles, user the less strict Ansible Lint profiles.
Starting with the min profile ensures that Ansible can load
your content:
ansible-lint --profile=min
As you move to the next stage of developing content, you can gradually apply profiles to avoid common pitfalls and brittle complexity.
When you are ready to publish or share your content,
you can use the shared and production profiles with much
stricter rules.
These profiles harden security, guarantee reliability,
and ensure your Ansible content is easy for others to contribute to and
use.
ansible-lint --profile=production
|
Note
|
Tags such as |
9.6. Running ansible-lint from the command line
To run Ansible Lint from the command, use the ansible-lint command.
Pass the files that you want to lint as arguments to
the ansible-lint command. For example, to lint
example_playbook1.yml and example_playbook2.yml, use the
following command:
$ ansible-lint path/to/example_playbook1.yml path/to/example_playbook2.yml
Run ansible-lint --help to display the command options for Ansible Lint.
Ansible Lint also handles playbooks that include other playbooks, tasks, handlers, or roles.
9.6.1. Command-line switches for ansible-lint
Run the following command to display ansible-lint commands and switches:
$ ansible-lint --help
The following table lists the options:
| Options | Description |
|---|---|
|
Show this help message and exit. |
|
List all profiles. No formatting options available. |
|
List all the rules. For listing rules, only the following formats for the |
|
List all the tags and the rules they cover. Increase the verbosity level with |
|
stdout formatting, |
|
SARIF output file |
|
quieter, reduce verbosity, can be specified twice. |
|
Specify which rules profile to be used. |
|
parseable output, same as |
|
Location of project/repository, autodetected based on location of configuration file. |
|
Specify custom rule directories. Add |
|
Keep default rules when using -r |
|
Return non-zero exit code on warnings as well as errors |
|
Allow ansible-lint to perform auto-fixes, including YAML reformatting. You can limit the effective rule transforms (the YAML reformatting happens whenever Using |
|
Display path relative to CWD |
|
only check rules whose id/tags match these values |
|
Increase verbosity level (-vv for more) |
|
Only check rules whose id/tags do not match these values. Example: |
|
Generate a text file |
`--warn-list WARN_LIST |
only warn about these rules, unless overridden in the config file. Default: |
|
activate optional rules by their tag name |
|
disable colored output, same as NO_COLOR=1 |
|
Force colored output, same as FORCE_COLOR=1 |
|
path to directories or files to skip. This option is repeatable. |
|
Specify configuration file to use. By default it looks for |
|
Specify ignore file to use. By default it looks for |
|
Disable installation of requirements.yml and schema refreshing |
|
Autofix
Ansible-lint provides an autofix feature that allows auto-fixing of some rule violations in Ansible files.
To reformat YAML files and run transform for the given rules, run the following command:
ansible-lint --fix [<write_list>]
Use the write-list to limit the rules that you want to auto-fix
by passing a keywords all or none or a comma separated list of rule ids or rule tags.
-
ansible-lint --fix ["all"](default) runs all transforms. -
ansible-lint --fix ["none"]disables all auto-fixes. -
ansible-lint --fix ["csv-list-of-rules"]enables a subset of rule transforms by listing rules/tags here.
The following rules allow autofix functionality.
| Options | Description |
|---|---|
|
Use shell only when shell functionality is required. |
|
Do not use |
|
Use FQCN for builtin actions. |
|
Rule that looks inside jinja2 templates. |
|
Ensure specific order of keys in mappings. |
|
Rule for checking task and play names. |
|
Rule for detecting discouraged free-form syntax for action modules. |
|
No Jinja2 in when. |
|
Password should not be logged. |
|
|
|
Violations reported by yamllint. |
9.6.2. Excluding ansible-lint rules
To exclude specific rules from being applied when linting a playbook, use the -x flag.
This is useful if you want to temporarily disable certain rules without modifying your configuration file.
The following example lints a file but skips the checks for YAML formatting rules and tabs:
ansible-lint -x no-tabs -x yaml <filename.yml>
9.7. Using ansible-lint in CI
9.7.1. Muting warnings to avoid false positives
Not all linting rules are precise. Some are general rules.
Advanced git, yum or apt usage, for example, can incorrectly
trigger Ansible Lint rule violations.
To disable rule violations for specific tasks in a playbook, and mute false positives,
add # noqa: [rule_id] to the end of the line.
Add a comment that explains why the rules are disabled.
You can add the # noqa: [rule_id] comment to the end of any line in
a task. You can also skip multiple rules with a space-separated list.
- name: This task would typically fire git-latest and partial-become rules
  become_user: alice # noqa: git-latest partial-become
  ansible.builtin.git: src=/path/to/git/repo dest=checkout
If the rule is line-based, # noqa: [rule_id] must be at the end of
the line.
- name: This would typically fire jinja[spacing]
  get_url:
    url: http://example.com/file.conf
    dest: "{{dest_proj_path}}/foo.conf" # noqa: jinja[spacing]
If you want Ansible-lint to skip a rule entirely, use the -x command
line argument or add it to skip_list in your configuration.
The least preferred method of skipping rules is to skip all task-based
rules for a task, which does not skip line-based rules. You can use the
skip_ansible_lint tag with all tasks, for example:
- name: This would typically fire no-free-form
  command: warn=no chmod 644 X

- name: This would typically fire git-latest
  git: src=/path/to/git/repo dest=checkout
  tags:
    - skip_ansible_lint
9.7.2. Caching
For optimal performance, Ansible-lint creates caches with installed or
mocked roles, collections, and modules in the {project_dir}/.cache
folder. The location of {project_dir} is passed with a command line
argument, determined by the location of the configuration file, git
project top-level directory, or user home directory.
To perform faster re-runs, Ansible-lint does not automatically clean the
cache. If required you can do this manually by simply deleting the
.cache folder. Ansible-lint creates a new cache on the next
invocation.
Add the .cache folder to the .gitignore file in your
git repositories.
9.7.3. Gradual adoption
For an easier gradual adoption, consider ignoring rules for an entire file. This allows the quick introduction of a linter pipeline for preventing the addition of new violations, while known violations are ignored. Some people can work on addressing these historical violations while others can continue to work on other maintenance tasks.
9.8. Vaults
Ansible Lint executes Ansible, therefore it needs access to encrypted secrets. If you do not give access to them or you are concerned about security implications, you must refactor your code to allow it to be linted without access to real secrets:
-
Configure dummy fallback values that are used during linting, so Ansible will not complain about undefined variables.
-
Exclude the problematic files from the linting process.
# Example of avoiding an undefined variable error
foo: "{{ undefined_variable_name | default('dummy') }}"
A well-written playbook or role must allow Ansible’s syntax check to pass, even if you do not have access to the vault.
Internally ansible-lint runs ansible-playbook --syntax-check on each playbook and also on roles.
As Ansible does not support running syntax-check directly on roles,
Ansible Lint creates temporary playbooks that only include each role from your project.
You can use`defaults/` to change the code for the role so that it does not cause syntax
errors when called without any variables or arguments.
See
Understanding variable precedence
for further information.
9.9. Dependencies and requirements
Ansible-lint will recognize requirements.yml files used for runtime
and testing purposes and install them automatically. Valid locations for
these files are:
-
roles/requirements.yml -
collections/requirements.yml -
tests/requirements.yml -
tests/integration/requirements.yml -
tests/unit/requirements.yml