Thank you for your interest in Red Hat Ansible Automation Platform. Ansible Automation Platform is a commercial offering that helps teams manage complex multi-tier deployments by adding control, knowledge, and delegation to Ansible-powered environments.
This guide describes how to install self-service automation portal and connect it with an instance of Ansible Automation Platform so that users can run automation jobs from self-service automation portal.
Providing feedback on Red Hat documentation
If you have a suggestion to improve this documentation, or find an error, you can contact technical support at https://access.redhat.com to open a request.
1. About self-service automation portal
Self-service automation portal makes enterprise automation accessible to users of varying roles and skill levels through a simplified web interface designed for business users, not automation experts.
Instead of requiring users to understand Ansible playbooks or complex automation workflows, self-service automation portal provides a streamlined "point-and-click" experience.
Self-service automation portal uses your existing Ansible Automation Platform setup: it uses the same logins, same security controls, and the same automation logic.
Job templates in Ansible Automation Platform are synced to self-service automation portal, where they appear as auto-generated self-service templates. Users can launch the auto-generated self-service templates in self-service automation portal to run the corresponding job templates in Ansible Automation Platform.
When launching a job, users follow step-by-step guided forms in self-service automation portal. These forms are identical to the forms for the equivalent job templates in Ansible Automation Platform.
You can also import custom self-service templates in self-service automation portal. These templates are pulled from a git repository, and their configuration file associates them with a job template in Ansible Automation Platform. The configuration file contains the forms for the template.
You can associate more than one custom self-service template with one Ansible Automation Platform job template. You set the RBAC for the custom self-service templates in self-service automation portal. Therefore you can set up different types of forms for users with different levels of automation experience.
For example, for a job template that configures network settings, you could associate a custom template with minimum scope for adjusting settings to a group with less automation experience, and use a more detailed custom template with deeper scope for configuration for automation experts.
Self-service automation portal connects with Red Hat Ansible Automation Platform using an OAuth application for authentication.
The following restrictions apply:
-
You can only use one Ansible Automation Platform instance.
-
You can only use one Ansible Automation Platform organization.
1.1. Supported platforms
Self-service automation portal supports installation using a Helm chart on OpenShift Container Platform, and Ansible Automation Platform version 2.6.
1.2. Interactive demonstration
You can explore the functionality of self-service automation portal in an interactive demonstration:
-
Launch the self-service automation portal interactive demo.
2. Installation overview
You can deploy self-service automation portal from a Helm chart on OpenShift Container Platform.
Helm is a tool that simplifies deployment of applications on Red Hat OpenShift Container Platform clusters. Helm uses a packaging format called Helm charts. A Helm chart is a package of files that define how an application is deployed and managed on OpenShift. The Helm chart for self-service automation portal is available in the OpenShift Helm catalog.
2.1. Prerequisites
-
You have a valid subscription to Red Hat Ansible Automation Platform.
-
You have access to an instance of Red Hat Ansible Automation Platform 2.6 with the appropriate permissions to create an OAuth application.
-
You have access to an OpenShift Container Platform instance (Version 4.12 or newer) with the appropriate permissions within your project to create an application.
-
You have installed
oc, the OpenShift command-line interface (CLI) tool, on your local machine. You can useoccommands in your terminal to interact with your OpenShift cluster.For information on installing
oc, see the Getting started with the OpenShift CLI chapter of the Understanding OpenShift Container Platform guide. -
You have installed Helm 3.10 or newer. Helm is a package manager for applications on OpenShift Container Platform. See the Installing Helm chapter of the OpenShift Container Platform Building applications guide.
3. Pre-installation configuration
Before you can install self-service automation portal, you must configure OAuth authentication, generate tokens, and set up a project, secrets, and a plug-in registry in OpenShift Container Platform.
3.1. Selecting an Ansible Automation Platform organization
You must choose an organization in Ansible Automation Platform to use with self-service automation portal. If you have not set up an organization, use the following procedure to create one.
-
Open your Ansible Automation Platform instance in a browser and log in as an administrator.
-
Navigate to .
-
Click Create organization.
-
Enter a unique Name and optionally provide a Description for your organization.
-
Click Next to show the Review pane.
-
Click Finish to create your organization.
3.2. Creating an OAuth application
To use the Helm chart to deploy self-service automation portal, you must have set up an OAuth application on your Ansible Automation Platform instance. However, you cannot run automation on your Ansible Automation Platform instance until you have deployed your self-service automation portal Helm chart, because the OAuth configuration requires the URL for your deployment.
Create the OAuth Application on your Ansible Automation Platform instance, using a placeholder name for the deployment URL.
After deploying self-service automation portal, you must replace the placeholder value with a URL derived from your deployment URL in your OAuth application.
The steps below describe how to create an OAuth Application in the Ansible Automation Platform Platform console.
-
Open your Ansible Automation Platform instance in a browser and log in.
-
Navigate to .
-
Click Create OAuth Application.
-
Complete the fields in the form.
-
Name: Add a name for your application.
-
Organization: Choose the organization.
-
Authorization grant type: Choose
Authorization code. -
Client type: choose
Confidential. -
Redirect URIs: Add placeholder text for the deployment URL (for example
https//:example.com).
-
-
Click Create OAuth application.
The Application information popup displays the
clientIdandclientSecretvalues. -
Copy the
clientIdandclientSecretvalues and save them.These values are used in an OpenShift secret for Ansible Automation Platform authentication.
3.3. Enabling Oauth token creation for external users
Self-service automation portal uses Ansible Automation Platform or authentication and as an OAuth provider.
You must enable OAuth token creation in Ansible Automation Platform so that users can authenticate with the platform from self-service automation portal.
Note: Users who do not have permission to log in to Ansible Automation Platform cannot log in to Self-service portal, because Ansible Automation Platform provides the OAuth tokens. Therefore, a user who is removed from an external IdP (for example LDAP, SAML, Azure) can no longer log into Ansible Automation Platform or self-service automation portal. This prevents potential external token issues. For more information, refer to the Manage OAuth2 token creation for external users section of Access management and authentication.
-
In a browser, log in to your Ansible Automation Platform instance as a user with admin privileges.
-
In the navigation pane, select .
-
Locate the Allow external users to create OAuth2 tokens setting.
-
Enable Allow external users to create OAuth2 tokens if it is not already enabled:
-
Click Edit platform gateway settings.
-
Set Allow external users to create OAuth2 tokens to Enabled.
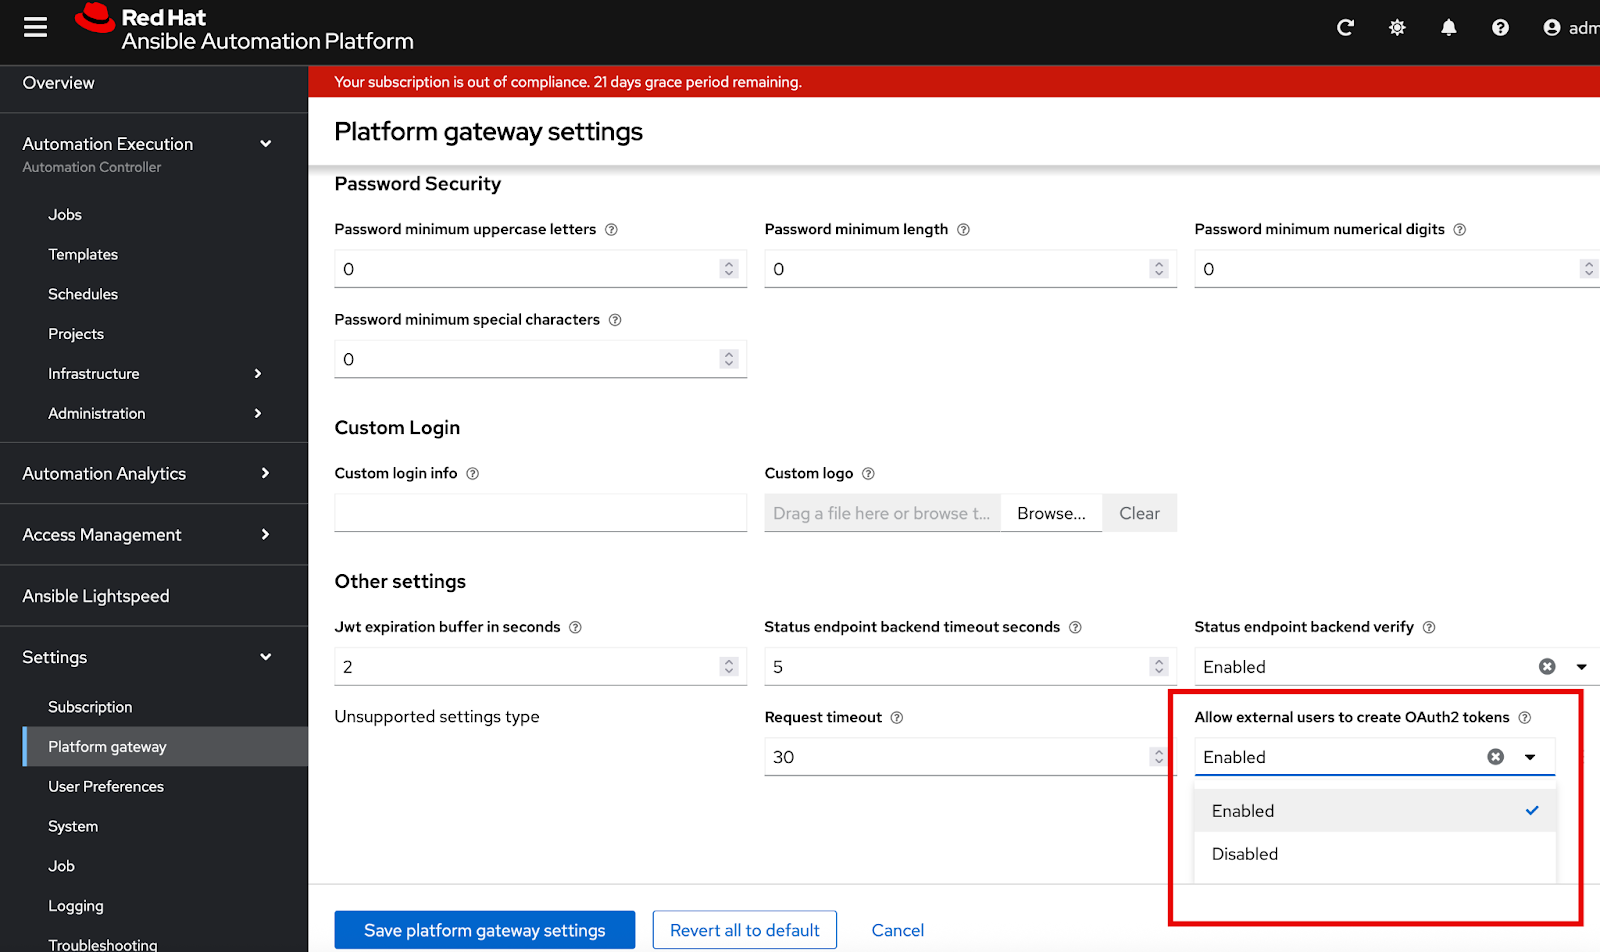
-
Click Save platform gateway settings to save your updates and return to the Platform gateway settings page.
-
-
In the Platform gateway settings page, verify that the Allow external users to create OAuth2 tokens setting is enabled.
3.4. Generating a token for Ansible Automation Platform admin user authentication
You must create a token in Ansible Automation Platform. The token is used in an OpenShift secret for Ansible Automation Platform authentication.
-
Log in to your instance of Ansible Automation Platform as the
adminuser. -
Navigate to .
-
Select the
adminuser. -
Select the Tokens tab
-
Click Create Token.
-
Select your OAuth application. In the Scope menu, select
Read.
-
Click Create Token to generate the token.
-
Save the new token.
The token is used in an OpenShift secret that is fetched by the Helm chart.
3.5. Generating Git personal access tokens
If you are linking external Source Control Management (SCM) systems to self-service automation portal, you must generate a Personal Access Token for authentication.
Self-service automation portal supports GitHub and GitLab SCMs.
3.5.1. Creating a personal access token (PAT) on GitHub
For more information about Personal access tokens in GitHub, see Creating a personal access token (classic) in the GitHub Authentication guide.
-
In a browser, log in to GitHub.
-
Click your profile picture and select Settings.
-
Select Developer settings.
-
Select Personal access tokens.
-
Click .
-
In the Select scopes: section, enable the following:
-
repo
-
read:org
-
workflow (as needed)
-
-
Click Generate token.
-
Save the personal access token.
3.5.2. Creating a personal access token (PAT) on Gitlab
For details on creating a personal access token in Gitlab, see Create a personal access token in the Gitlab documentation.
-
In a browser, log in to Gitlab and click your avatar.
-
Select Edit profile.
-
Select Access tokens.
-
Click Add new token.
-
Provide a name and expiration date for the token.
-
In the Scopes: section, select the following:
-
read_repository
-
api
-
-
Click Create personal access token.
-
Save the personal access token.
3.6. Setting up a project for self-service automation portal in OpenShift Container Platform
You must set up a project in OpenShift Container Platform for self-service automation portal.
You can create the project from a terminal using the oc command.
Alternatively, you can create the project in the OpenShift Container Platform console.
For more about OpenShift Container Platform projects, see the Building applications guide in the OpenShift Container Platform documentation.
3.6.1. Setting up a project in the OpenShift Container Platform web console
You can use the OpenShift Container Platform web console to create a project in your cluster.
-
In a browser, log in to the OpenShift Container Platform web console.
-
Choose the Developer perspective.
-
Click the Project menu and select Create project.
-
In the Create Project dialog box, enter a unique name Name field.
-
Lowercase alphanumeric characters (
a-z,0-9) and the hyphen character (-) are permitted for project names. -
The underscore (
_) character is not permitted. -
The maximum length for project names is 63 characters.
-
-
Optional: display name and description for your project.
-
-
Click Click to create the project.
3.6.2. Setting up an OpenShift Container Platform project using oc
You can run commands from your terminal to add a project to your cluster.
-
You have the login details for your Openshift cluster.
-
You have installed the
ocCLI tool. This is a command-line tool for interacting with and managing an OpenShift cluster from a terminal.
-
In a terminal, log in to OpenShift Container Platform using your credentials:
oc login <OpenShift_API_URL> -u <username>
The following example shows the output for a successful login:
$ oc login https://api.<my_cluster>.com:6443 -u kubeadmin
WARNING: Using insecure TLS client config. Setting this option is not supported!

Console URL: https://api.<my_cluster>.com:6443/console
Authentication required for https://api.<my_cluster>.com:6443 (openshift)
Username: kubeadmin
Password:
Login successful.

You have access to 22 projects, the list has been suppressed. You can list all projects with 'oc projects'

Using project "default".
-
Create a new project. Use a unique project name.
$ oc new-project <self-service-project-name>
-
Lowercase alphanumeric characters (
a-z,0-9) and the hyphen character (-) are permitted for project names. -
The underscore (
_) character is not permitted. -
The maximum length for project names is 63 characters.
Example:
$ oc new-project <my-project>

Now using project "my-project" on server "https://openshift.example.com:6443".
-
-
Open your new project:
$ oc project <self-service-project-name>
3.7. Creating a plug-in registry in OpenShift
You must create a registry in OpenShift Container Platform for the .tar files for self-service automation portal.
3.7.1. Downloading the plug-in TAR files
Download the latest .tar.gz plug-in files for self-service automation portal from the Red Hat Customer Portal.
-
Create a directory on your local machine to store the files.
$ mkdir /path/to/<automation-portal-plugins>
-
Set an environment variable (
$DYNAMIC_PLUGIN_ROOT_DIR) to represent the directory path.$ export DYNAMIC_PLUGIN_ROOT_DIR=/path/to/<automation-portal-plugins>
-
Download the setup bundle. In a browser, navigate to the Red Hat Ansible Automation Platform Product Software downloads page. and select the Product Software tab.
-
Click Download now next to Ansible self-service automation portal Setup Bundle to download the latest version of the plug-ins.
The format of the filename is
self-service-automation-portal-plugins-x.y.z.tar.gz.Substitute the Ansible plug-ins release version, for example
2.0.0, forx.y.z. -
Extract the
self-service-automation-portal-plugins-<version-number>.tar.gzcontents to$DYNAMIC_PLUGIN_ROOT_DIR.$ tar --exclude='*code*' -xzf self-service-automation-portal-plugins-x.y.z.tar.gz -C $DYNAMIC_PLUGIN_ROOT_DIR
Substitute the Ansible plug-ins release version, for example
2.0.0, forx.y.z.
Run ls to verify that the extracted files are in the $DYNAMIC_PLUGIN_ROOT_DIR directory:
$ ls $DYNAMIC_PLUGIN_ROOT_DIR
ansible-plugin-backstage-rhaap-dynamic-x.y.z.tgz
ansible-plugin-backstage-rhaap-dynamic-x.y.z.tgz.integrity
ansible-plugin-scaffolder-backend-module-backstage-rhaap-dynamic-x.y.z.tgz
ansible-plugin-scaffolder-backend-module-backstage-rhaap-dynamic-x.y.z.tgz.integrity
The files with the .integrity file type contain the plugin SHA value.
3.7.2. Setting up the plugin registry image
Set up a registry in your OpenShift cluster to host the plug-ins and make them available for installation.
-
Log in to your OpenShift Container Platform instance with credentials to create a new application.
-
Open your OpenShift project for self-service automation portal.
$ oc project <AAP-self-service-project-name>
-
Run the following commands to create a plugin registry build in in your OpenShift project.
$ oc new-build httpd --name=plugin-registry --binary
$ oc start-build plugin-registry --from-dir=$DYNAMIC_PLUGIN_ROOT_DIR --wait
$ oc new-app --image-stream=plugin-registry
3.7.3. Verifying the plug-in registry deployment
You can verify that the plugin-registry deployed correctly in the OpenShift Container Platform web console, or you can use a CLI command.
-
To verify the deployment using a CLI command:
-
Run the following command from a terminal to verify that the plugin-registry deployed correctly:
$ oc exec $(oc get pods -l deployment=plugin-registry -o jsonpath='{.items[0].metadata.name}') -- ls -l /opt/app-root/src -
Confirm that the following required TAR files are in the plugin registry:
ansible-plugin-scaffolder-backend-module-backstage-rhaap-dynamic-x.y.z.tgz
ansible-backstage-plugin-auth-backend-module-rhaap-provider-dynamic-x.y.z.tgz
ansible-backstage-plugin-catalog-backend-module-rhaap-dynamic-x.y.z.tgz
ansible-plugin-backstage-self-service-dynamic-x.y.z.tgz
-
-
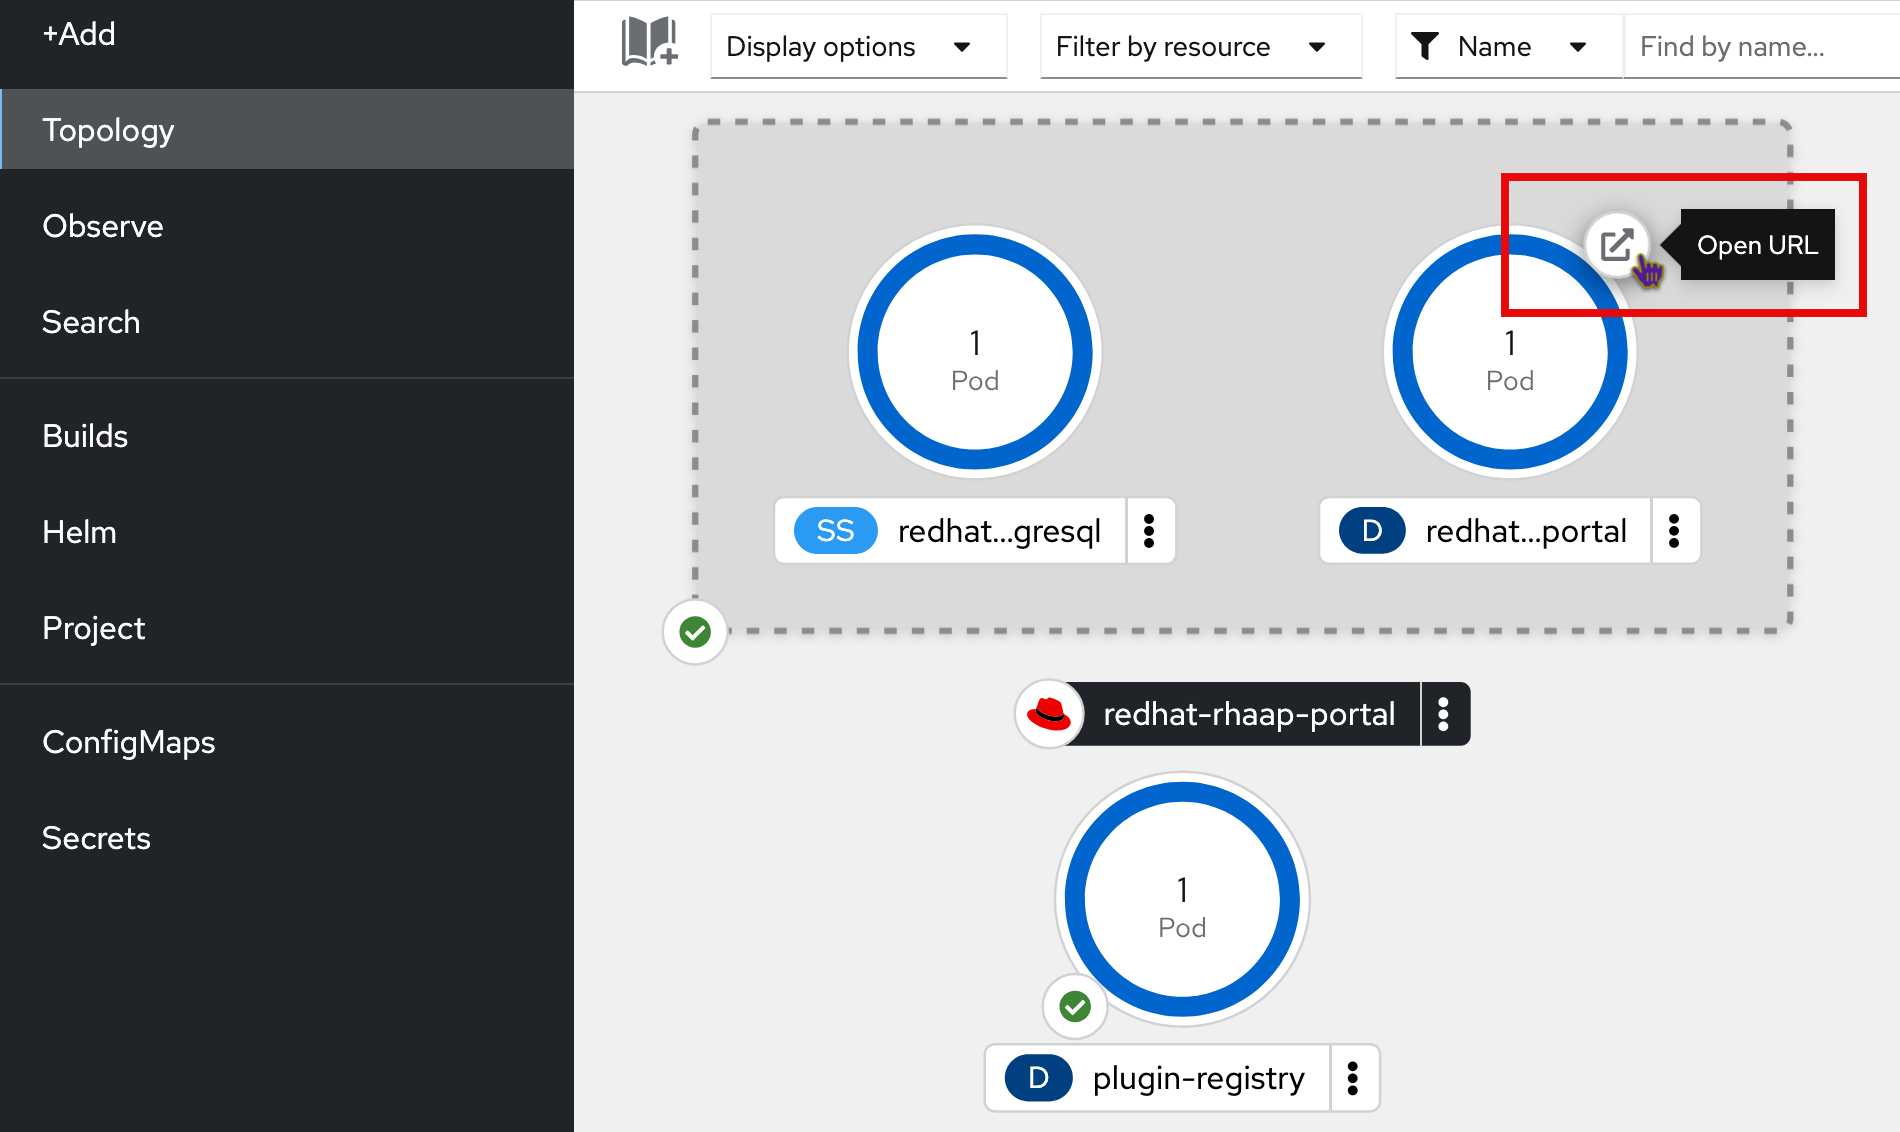
To confirm that the plugin-registry deployed correctly from the OpenShift Container Platform web console:
-
Open the Topology view in the Developer perspective for your project in the OpenShift web console.
-
Select the plugin registry icon to open the plugin-registry details pane.
-
In the Pods section of the plugin-registry details pane, click View logs for the
plugin-registry-#########-####pod.
(1) Plug-in registry
-
Click the terminal tab and log in to the container.
-
In the terminal, run
lsto confirm that the TAR files are in the plugin registry.ansible-plugin-scaffolder-backend-module-backstage-rhaap-dynamic-x.y.z.tgz ansible-backstage-plugin-auth-backend-module-rhaap-provider-dynamic-x.y.z.tgz ansible-backstage-plugin-catalog-backend-module-rhaap-dynamic-x.y.z.tgz ansible-plugin-backstage-self-service-dynamic-x.y.z.tgz
The version numbers and file names can differ.
-
3.8. Creating secrets in OpenShift for your environment variables
Before installing the Helm chart, you must create a set of secrets in your OpenShift project. The self-service automation portal Helm chart fetches environment variables from OpenShift secrets.
3.8.1. Creating Ansible Automation Platform authentication secrets
You must create a secret in OpenShift Container Platform for Ansible Automation Platform authentication.
-
Log in to your OpenShift Container Platform instance.
-
Open your OpenShift project for self-service automation portal in the Administrator view.
-
Click Secrets in the side pane.
-
Click Create to open the form for creating a new secret.
-
Select the Key/Value option.
-
Create a secret named
secrets-rhaap-portal.NoteThe secret must use this exact name.
-
Add the following key-value pairs to the secret.
NoteThe secrets must use the exact key names specified below.
-
Key:
aap-host-urlValue needed: Ansible Automation Platform instance URL
-
Key:
oauth-client-idValue needed: Ansible Automation Platform OAuth client ID
-
Key:
oauth-client-secretValue needed: Ansible Automation Platform OAuth client secret value
-
Key:
aap-tokenValue needed: Token for Ansible Automation Platform user authentication (must have
writeaccess).
-
-
Click Create to create the secret.
3.8.2. Creating Creating GitHub and Gitlab secrets
-
Log in to your OpenShift Container Platform instance.
-
Open your OpenShift project for self-service automation portal.
-
Click Secrets in the side pane.
-
Click Create to open the form for creating a new secret.
-
Select the Key/Value option.
-
Create a secret named
secrets-scm.NoteThe secret must use this exact name.
-
Add the following key-value pairs to the secret. If you are only using one SCM, just add the key-value pair for that SCM.
NoteThe secrets must use the exact key names specified below.
-
Key:
github-tokenValue needed: Github Personal Access Token (PAT)
-
Key:
gitlab-tokenValue needed: Gitlab Personal Access Token (PAT)
-
-
Click Create to create the secret.
4. Installing the self-service automation portal Helm chart
4.1. Configuring the self-service automation portal Helm chart from the OpenShift catalog
-
You have created a project for self-service automation portal in OpenShift Container Platform.
-
You have created a plugin registry in your project.
-
You have set up secrets for Ansible Automation Platform authentication and SCM authentication.
-
In a browser, navigate to your OpenShift project for self-service automation portal that you created earlier.
-
Select the Developer view.
-
Click the Helm option in the OpenShift sidebar.
-
In the Helm page, click Create and select Helm Release.
-
Search for
Portalin the Helm Charts filter, and select theAutomation Portalchart. -
In the modal dialog on the chart page, click Create.
-
Select the YAML view in the Create Helm Release page.
-
Locate the
clusterRouterBasekey in the YAML file and replace the placeholder value with the base URL of your OpenShift instance.The base URL is the URL portion of your OpenShift URL that follows
https://console-openshift-console, for exampleapps.example.com:redhat-developer-hub global: clusterRouterBase: apps.example.com -
The Helm chart is set up for the Default Ansible Automation Platform organization.
To update the Helm chart to use a different organization, update the value for the
catalog.providers.rhaap.orgskey fromDefaultto your Ansible Automation Platform organization name.catalog: providers: rhaap: production: # Replace 'Default' with the name of the organization you created orgs: '<your-org-name>' -
Click Create to launch the deployment.
4.2. Verifying the installation
Verify the Helm chart installation from the OpenShift Container Platform web console.
-
In a browser, log in to your OpenShift instance.
-
In the Developer view, navigate to the Topology view for the namespace where you deployed the Helm chart.
The deployment appears: the label on the icon is
D. The name of the deployment is<installation-name>-backstage, for example<my-self-service-automation-portal-backstage>.While it is deploying, the icon is light blue. The color changes to dark blue when deployment is complete.

5. Installing self-service automation portal in air-gapped OpenShift Container Platform environments
You can install self-service automation portal in a disconnected OpenShift Container Platform environment.
5.1. Prerequisites
-
You have installed the OpenShift CLI (
oc). See the Getting started with the OpenShift CLI chapter of the Understanding OpenShift Container Platform guide. -
You have installed Helm 3.10 or newer. See the Installing Helm chapter of the OpenShift Container Platform Building applications guide.
-
You have installed and configured Podman for pulling and pushing container images.
-
You have internet access. This is required to pull images and charts from public repositories, including
registry.redhat.ioandhttps://charts.openshift.io/. -
A Red Hat pull secret, for exmaple
pull-secret.jsonor similar credentials file that allows you to pull images fromregistry.redhat.io. -
Sufficient disk space to store downloaded images and chart packages.
-
Access to public registries: Docker Hub,
quay.io,registry.redhat.io, and your disconnected OpenShift cluster’s internal registry.
5.2. Preparing for air-gapped installation
Before you can install self-service automation portal in a disconnected OpenShift Container Platform environment, you must complete some processes on a connected bastion host.
5.2.1. Mirroring container images
-
Log in to
registry.redhat.io:$ podman login registry.redhat.io
Enter your Red Hat username and password when prompted.
Alternatively, you can use:
$ podman login --authfile <path_to_pull_secret.json> registry.redhat.io
-
Log in to your disconnected registry:
$ podman login <disconnected_registry_url>
-
Pull the original image from
registry.redhat.io:$ podman pull registry.redhat.io/rhdh/rhdh-hub-rhel9:x.y.z
-
Tag the image for your disconnected registry:
$ podman tag registry.redhat.io/rhdh/rhdh-hub-rhel9:x.y.z <disconnected_registry_url>/<your_namespace>/rhdh-hub-rhel9:x.y.z
Example:
$ podman tag registry.redhat.io/rhdh/rhdh-hub-rhel9:1.1.0 my-disconnected-registry.com/myproject/rhdh-hub-rhel9:1.1.0
-
Push the tagged image to your disconnected registry:
$ podman push <disconnected_registry_url>/<your_namespace>/rhdh-hub-rhel9:x.y.z
5.2.2. Downloading the helm chart package
-
Add the OpenShift Helm charts repository:
$ helm repo add openshift-helm-charts https://charts.openshift.io/
-
Update your Helm repositories to fetch the latest chart information:
$ helm repo update
-
Pull the chart:
$ helm pull openshift-helm-charts/redhat-rhaap-portal --version x.y.z
This command downloads the chart as a
.tgzfile, for example redhat-rhaap-portal-1.0.1.tgz. -
Unpack the chart:
$ tar -xvf redhat-rhaap-portal-x.y.z.tgz
This creates a directory with a name similar to
redhat-rhaap-portal-1.0.1/. -
Navigate to the unpacked chart directory (for example,
cd redhat-rhaap-portal-1.0.1) and open thevalues.yamlfile in a text editor. -
Find all the
image:entries invalues.yamland replace the original image references with the full path to the image in your disconnected registry.For example, replace
image: registry.redhat.io/rhdh/rhdh-hub-rhel9:x.y.zwithimage: <disconnected_registry_url>/<your_namespace>/rhdh-hub-rhel9:x.y.z -
Repack the modified chart:
$ helm package redhat-rhaap-portal-x.y.z
This creates a new
.tgzfile with your changes (for example,redhat-rhaap-portal-1.0.1.tgz).
5.2.3. Transferring assets to the disconnected environment
-
Copy the modified Helm chart
.tgzfile or files (for example,redhat-rhaap-portal-1.0.1.tgz) from your connected bastion host to a machine or jump box within your disconnected OpenShift network.
5.3. Installing the Helm chart in the disconnected OpenShift environment
5.3.1. Accessing the disconnected OpenShift environment
Ensure you have the necessary kubeconfig and permissions, for example cluster-admin, for setting up image pull secrets or insecure registries.
-
In a terminal, log in to your disconnected OpenShift cluster using the
ocCLI.oc login --token=<your_token> --server=<your_openshift_api_url>
Use the following command if you have a kubeconfig:
export KUBECONFIG=/path/to/your/kubeconfig
oc login
-
Ensure that your OpenShift cluster is configured to trust your disconnected registry:
-
Use
ImageContentSourcePolicyfor mirroring. -
Use
additionalTrustedCAinimage.config.openshift.io/clusterfor self-signed certificates. -
Use
insecure-registriesfor plain HTTP.
-
5.3.2. Defining Parameters and Navigate to Chart Location
-
On the machine within your disconnected environment, navigate to the directory where you placed the transferred Helm chart
.tgzfile.cd /path/to/your/transferred/charts/
Example:
cd /opt/disconnected-assets/charts/
-
If the namespace doesn’t exist, create it:
oc new-project ${MY_NAMESPACE} -
Define your namespace and cluster router base as environment variables for easier use:
export MY_NAMESPACE="<your_namespace_name>"
export MY_CLUSTER_ROUTER_BASE="<your_cluster_router_base>"
Example:
export MY_NAMESPACE="rhdh-dev"
export MY_CLUSTER_ROUTER_BASE="apps.yourcluster.example.com"
5.3.3. Installing the Helm chart
-
Install the chart using the
helm installcommand, referencing the local.tgzfile by its name and using--setflags to provide necessary overrides.Add more
--setflags for any other values that were in your originalvalues.yamlfile.$ helm install redhat-rhaap-portal \ redhat-rhaap-portal-x.y.z.tgz \ --namespace ${MY_NAMESPACE} \ --set redhat-developer-hub.global.clusterRouterBase=${MY_CLUSTER_ROUTER_BASE} \ --set redhat-developer-hub.image.name=<disconnected_registry_url>/<your_namespace>/rhdh-hub-rhel9:x.y.z \-
redhat-rhaap-portal: the release name for your Helm deployment. -
redhat-rhaap-portal-x.y.z.tgz: the local path/filename to your modified Helm chart .tgz file. -
--namespace ${MY_NAMESPACE}: the OpenShift project (namespace) where the chart will be installed, using your defined variable. -
--set redhat-developer-hub.global.clusterRouterBase=${MY_CLUSTER_ROUTER_BASE}: the cluster router base, using your defined variable.
-
5.4. Verifying the disconnected installation
-
Check the Helm release status:
$ helm list -n ${MY_NAMESPACE} -
Monitor the pods in your namespace to ensure they are running:
$ oc get pods -n ${MY_NAMESPACE} -
Check for
ImagePullBackOffor other errors in pod events:$ oc describe pod <pod_name> -n ${MY_NAMESPACE} -
If the chart uses routes to expose services, verify that the routes are created and accessible:
$ oc get route -n ${MY_NAMESPACE}
6. Inspecting the deployment on OpenShift
You can inspect the deployment logs and ConfigMap on the OpenShift console to verify that the deployment conforms with the settings in your Helm chart.
6.1. Viewing the deployment logs
-
In a browser, log in to your OpenShift instance.
-
In the Developer view, navigate to the Topology view for the namespace where you deployed the Helm chart.
-
The deployment appears: the label on the icon is
D.The name of the deployment is
<installation-name>-backstage, for example<my-self-service-automation-portal-backstage>. -
Click the icon representing the deployment.
-
The Details pane for the deployment opens.
-
Select the Resources tab.
-
Click View logs for the deployment pod in the Pods section:

The Pod details page opens for the deployment pod.
-
Select the Logs tab in the Pod details page.
-
To view the install messages, select the
install-dynamic-pluginscontainer from the INIT CONTAINERS section of the dropdown list of containers:
The log stream displays the progress of the installation of the plug-ins from the plug-in registry.
The log stream for successful installation of the plug-ins resembles the following output:
 ======= Installing dynamic plugin http://plugin-registry:8080/ansible-backstage-plugin-catalog-backend-module-rhaap-dynamic-0.1.0.tgz
 *=> Grabbing package archive through pm pack'
 •=› Vertfying package Integrity
 •*> Extracting package archtve /dynamtc-plugtns-root/anstble-backstage-plugtn-catalog-backend-nodule-rhaap-dynamic-0.1.0.tgz
 •*› Removing package archive /dynamic-plugins-root/ansible-backstage-plugin-catalog-backend-module-rhaap-dynamic-0.1.0. tgz
 -> Successfully installed dynamic plugin http://plugin-registry:8080/ansible-backstage-plugin-catalog-backend-module-rhaap-dynamic-0.1.0.tgz
-
Select the Environment tab in the Pod details page to view the environment variables for the containers. If you set additional environment variables in your Helm chart, check that they are listed here.

7. Accessing the self-service automation portal deployment
7.1. Adding the deployment URL to the OAuth Application
When you set up your OAuth application in Ansible Automation Platform before deploying self-service automation portal,
you added placeholder text for the Redirect URIs value.
You must update this value using the URL from the deployed application so that you can run automation on self-service automation portal from self-service automation portal.
-
Determine the
Redirect URIfrom your OpenShift deployment:-
Open the URL for the deployment from the OpenShift console to display the sign-in page for self-service automation portal.
-
Copy the URL for the sign-in page for self-service automation portal.
-
To determine the
Redirect URIvalue, append/api/auth/rhaap/handler/frameto the end of the deployment URL.For example, if the URL for the deployment is
https://my-automation-portal-project.mycluster.com, then theRedirect URIvalue ishttps://my-automation-portal-project.mycluster.com/api/auth/rhaap/handler/frame.
-
-
Update the
Redirect URIsfield in the OAuth application in Ansible Automation Platform:-
In a browser, open your instance of Ansible Automation Platform.
-
Navigate to .
-
In the list view, click the OAuth application you created.
-
Replace the placeholder text in the
Redirect URIsfield with the value you determined from your OpenShift deployment. -
Click
Saveto apply the changes.
-
7.2. Signing in to self-service automation portal
-
You have configured an OAuth application in Ansible Automation Platform for self-service automation portal.
-
You have configured a user account in Ansible Automation Platform.
-
In a browser, navigate to the URL for self-service automation portal to open the sign-in page.

-
Click Sign In.
-
The sign-in page for Ansible Automation Platform appears:

-
Enter your Ansible Automation Platform credentials and click Log in.
-
The self-service automation portal web console opens.
7.3. Setting up initial RBAC rules in self-service automation portal
After you install self-service automation portal and synchronize it with Ansible Automation Platform, only users with admin privileges can view the auto-generated templates.
You must configure initial Role-Based Access Control (RBAC) in self-service automation portal to enable users who do not have admin privileges to view and execute auto-generated templates.
-
You have credentials for an Ansible Automation Platform account that has admin privileges.
-
Synchronization of users, groups, and teams from Ansible Automation Platform is complete.
-
The Allow external users to create OAuth2 tokens setting is enabled in the settings in Ansible Automation Platform.
-
Log in to self-service automation portal with an account that has admin privileges.
-
In the navigation pane of self-service automation portal, select Administration > RBAC.
-
Click Create to create a new role.
-
In the Create Role section, enter a name for the new role, for example
auto-generated-templates-role, then click Next.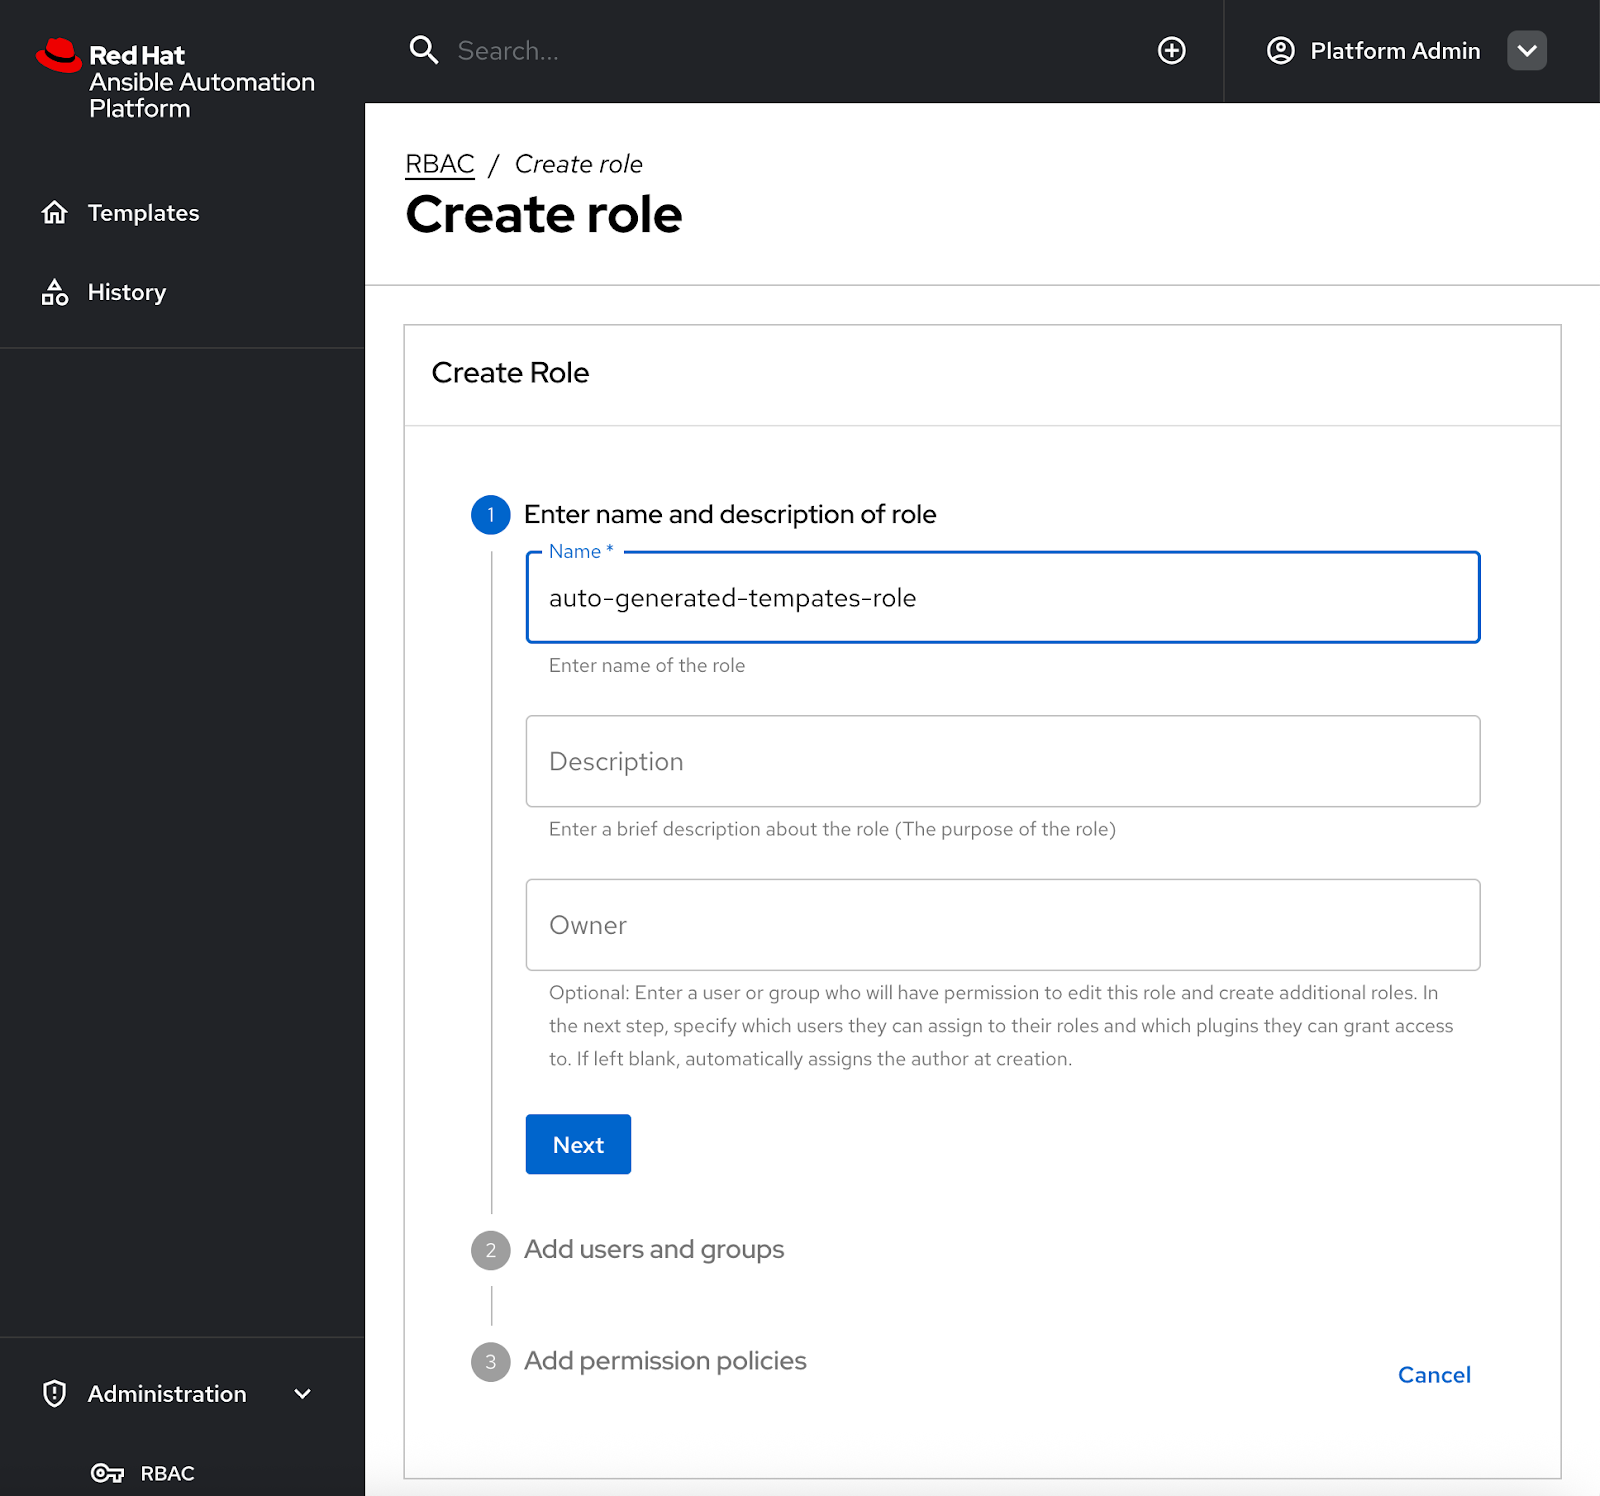
-
In the Users and Groups section, select the Ansible Automation Platform teams and users to assign to this role, then click Next.
You can only select teams and users from the Organization that you are using in self-service automation portal.
-
In the Add permission policies section, select the Catalog and Scaffolder plugins from the Select plugins dropdown menu. The selected plug-ins are added to a list.
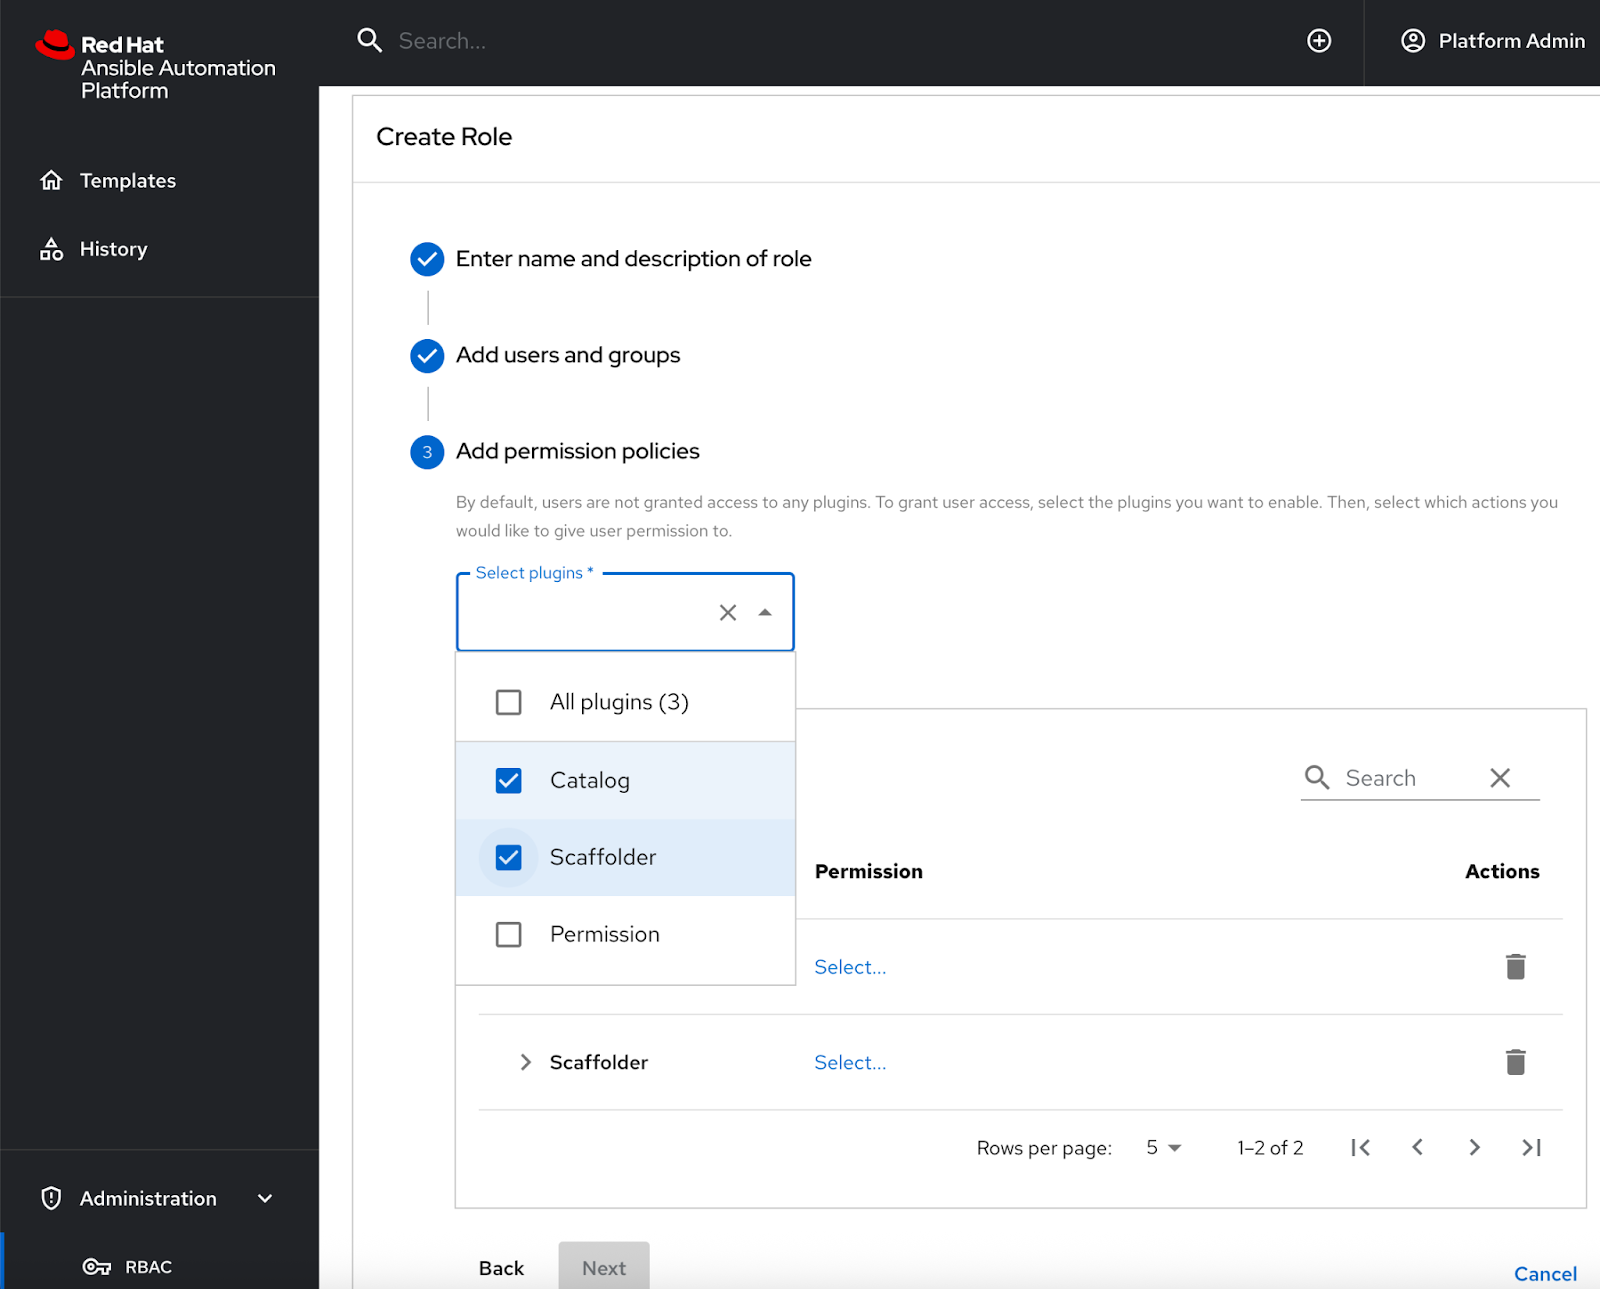
-
Click Select to expand Catalog and Scaffolder in the list of plug-ins.
-
To allow users to view templates and execute jobs in Ansible Automation Platform, grant the following minimum permissions for the selected plug-ins by selecting the check box to the left of the permission names.
-
Catalog permissions:
-
catalog.entity.read
-
-
Scaffolder permissions:
-
scaffolder.template.parameter.read -
scaffolder.template.step.read -
scaffolder.action.execute -
scaffolder.task.cancel -
scaffolder.task.create -
scaffolder.task.readNoteThe
scaffolder.task.readpermission must be enabled so that users can view previous task runs in the History page in the self-service automation portal console.
-
-
-
Click Next to review your settings, then Create to create the new role.
On successful completion, your new role is included in the All roles list when you select in the navigation pane in self-service automation portal.
-
Log in to self-service automation portal as a non-admin user who is a member of a team you granted permissions to. Confirm that the user can see auto-generated templates in self-service automation portal. These correspond to the Ansible Automation Platform job templates that the user has Execute permissions for.
To learn more about configuring RBAC in Ansible Automation Platform, see the self-service automation portal interactive demo.
7.4. Adjusting synchronization frequency between Ansible Automation Platform and self-service automation portal
The Helm chart defines how frequently users, teams and organization configuration information is synchronized from Ansible Automation Platform to self-service automation portal.
The frequency is set by the catalog.providers.rhaap.schedule.frequency key.
By default, the synchronization occurs hourly.
-
To adjust the synchronization frequency, edit the value for the
catalog.providers.rhaap.schedule.frequencykey in the Helm chart.catalog: ... providers: rhaap: '{{- include "catalog.providers.env" . }}': schedule: frequency: {minutes: 60} timeout: {seconds: 30}
|
Note
|
Increasing the synchronization frequency generates extra traffic. Bear this in mind when deciding the frequency, particularly if you have a large number of users. |
8. Upgrading self-service automation portal
To ensure that your self-service automation portal deployment has the latest features and fixes, you must upgrade the plug-in registry and Helm chart to the latest versions.
8.1. Downloading the plug-in TAR files
Download the latest .tar.gz plug-in files for self-service automation portal from the Red Hat Customer Portal.
-
Create a directory on your local machine to store the files.
$ mkdir /path/to/<automation-portal-plugins>
-
Set an environment variable (
$DYNAMIC_PLUGIN_ROOT_DIR) to represent the directory path.$ export DYNAMIC_PLUGIN_ROOT_DIR=/path/to/<automation-portal-plugins>
-
Download the setup bundle. In a browser, navigate to the Red Hat Ansible Automation Platform Product Software downloads page. and select the Product Software tab.
-
Click Download now next to Ansible self-service automation portal Setup Bundle to download the latest version of the plug-ins.
The format of the filename is
self-service-automation-portal-plugins-x.y.z.tar.gz.Substitute the Ansible plug-ins release version, for example
2.0.0, forx.y.z. -
Extract the
self-service-automation-portal-plugins-<version-number>.tar.gzcontents to$DYNAMIC_PLUGIN_ROOT_DIR.$ tar --exclude='*code*' -xzf self-service-automation-portal-plugins-x.y.z.tar.gz -C $DYNAMIC_PLUGIN_ROOT_DIR
Substitute the Ansible plug-ins release version, for example
2.0.0, forx.y.z.
Run ls to verify that the extracted files are in the $DYNAMIC_PLUGIN_ROOT_DIR directory:
$ ls $DYNAMIC_PLUGIN_ROOT_DIR
ansible-plugin-backstage-rhaap-dynamic-x.y.z.tgz
ansible-plugin-backstage-rhaap-dynamic-x.y.z.tgz.integrity
ansible-plugin-scaffolder-backend-module-backstage-rhaap-dynamic-x.y.z.tgz
ansible-plugin-scaffolder-backend-module-backstage-rhaap-dynamic-x.y.z.tgz.integrity
The files with the .integrity file type contain the plugin SHA value.
8.2. Updating the plug-in registry
To update the plug-in registry, you must upload your plug-in files to OpenShift, and start a new build of the registry.
-
You have downloaded the plug-in TAR files for self-service automation portal.
-
You have set an environment variable, for example
$DYNAMIC_PLUGIN_ROOT_DIR, to represent the path to the local directory where you have stored the TAR files.
-
In a terminal, log in to your OpenShift Container Platform instance.
-
Open your OpenShift project for self-service automation portal.
$ oc project <YOUR_SELF_SERVICE_AUTOMATION_PORTAL_PROJECT>
-
Find the name of your current plug-in registry build configuration:
$ oc get buildconfig
-
From the output, identify the correct build configuration name, for example
aap-self-service-plugins. -
Run the following command to start a new build in in your OpenShift project.
$ oc start-build <build_config_name> --from-dir=$DYNAMIC_PLUGIN_ROOT_DIR --wait
-
The command assumes that
$DYNAMIC_PLUGIN_ROOT_DIRrepresents the directory for your TAR files. Replace this in the command if you have chosen a different environment variable name. -
Replace
<build_config_name>with the build configuration name you identified.
When the build starts, the following message is displayed:
 Uploading directory "/path/to/dynamic_plugin_root" as binary input for the build ...
 Uploading finished
-
-
Open the Topology view in the Developer perspective for your project in the OpenShift web console.
-
Select the plugin registry icon to open the plugin-registry details pane.
-
In the Pods section of the plugin-registry details pane, select View logs for the new build pod. The format for the pod name is
<build_config_name>-<build_number>-build. -
Click the terminal tab and log in to the container.
-
In the terminal, run
lsto view the TAR files in the plugin registry. -
Verify that the new TAR files have been uploaded.
8.3. Updating the self-service automation portal version numbers for a Helm installation
After you have updated your plug-in registry for your self-service automation portal project on your OpenShift Container Platform instance, you must update the Helm chart with the new versions of your plug-ins files.
You can update the Helm chart from the command line using helm commands, or from the OpenShift web console.
|
Note
|
For upgrades in air-gapped or disconnected environments, the standard procedure cannot be used directly. You must first mirror the necessary container images to your local registry and prepare the Helm chart for offline use. For detailed instructions on this process, see the Installing the self-service automation portal in an air-gapped environment section of Installing self-service automation portal. |
-
Update the Helm chart from the command line:
-
In a terminal, log in to your OpenShift instance.
-
Run the following command to ensure your Helm repository is up to date:
$ helm repo update
-
Find the latest version of the Helm chart:
$ helm search repo openshift-helm-charts/redhat-rhaap-portal
-
Upgrade the Helm release:
$ helm upgrade <release_name> openshift-helm-charts/redhat-rhaap-portal --version <chart_version>
Replace
<release_name>with the name of your Helm release and<chart_version>with the new Helm chart version number you identified in the previous step.
-
-
Update the Helm chart using the OpenShift web console:
-
In a browser, log in to your OpenShift Container Platform web console.
-
Switch to the Developer perspective.
-
From the navigation menu, Select Helm.
-
Find your existing self-service automation portal deployment in the list of Helm releases and click its name.
-
Select .
-
In the Upgrade pane, select the version that you want to upgrade to from the Chart Version dropdown list.
-
Review the YAML configuration to ensure your custom values are preserved.
-
Click Upgrade to begin the upgrade.
-
After the upgrade completes, verify that the updated self-service automation portal instance is running: . In the OpenShift Container Platform web console, navigate to the Topology view for your project. . Check that the self-service automation portal instance is available and that all associated pods are in a Running state.
9. Telemetry capturing
The telemetry data collection feature helps in collecting and analyzing the telemetry data to improve your experience with self-service automation portal. This feature is enabled by default.
9.1. Telemetry data collected by Red Hat
Red Hat collects and analyses the following data:
-
Events of page visits and clicks on links or buttons.
-
System-related information, for example, locale, timezone, user agent including browser and OS details.
-
Page-related information, for example, title, category, extension name, URL, path, referrer, and search parameters.
-
Anonymized IP addresses, recorded as
0.0.0.0. -
Anonymized username hashes, which are unique identifiers used solely to identify the number of unique users of the RHDH application.
9.2. Disabling telemetry data collection
You can disable and enable the telemetry data collection feature for self-service automation portal by updating the Helm chart for your OpenShift Container Platform project.
-
Log in to the OpenShift Container Platform console and open the project for self-service automation portal in the Developer perspective.
-
Navigate to Helm.
-
Click the More actions ⋮ icon for your self-service automation portal Helm chart and select Upgrade.
-
Select YAML view.
-
Locate the
redhat-developer-hub.global.dynamic.pluginssection of the Helm chart. -
To disable telemetry data collection, add the following lines to the
redhat-developer-hub.global.dynamic.pluginssection.redhat-developer-hub: global: .... dynamic: plugins: - disabled: true package: >- ./dynamic-plugins/dist/backstage-community-plugin-analytics-provider-segmentTo re-enable telemetry data collection, delete these lines.
-
Click Upgrade to apply the changes to the Helm chart and restart the pod.